
A Complete Beginner’s Guide to Running an ETC Node with ETCMC
1. Create a ETC (Ethereum Classic) Wallet 🔗
-
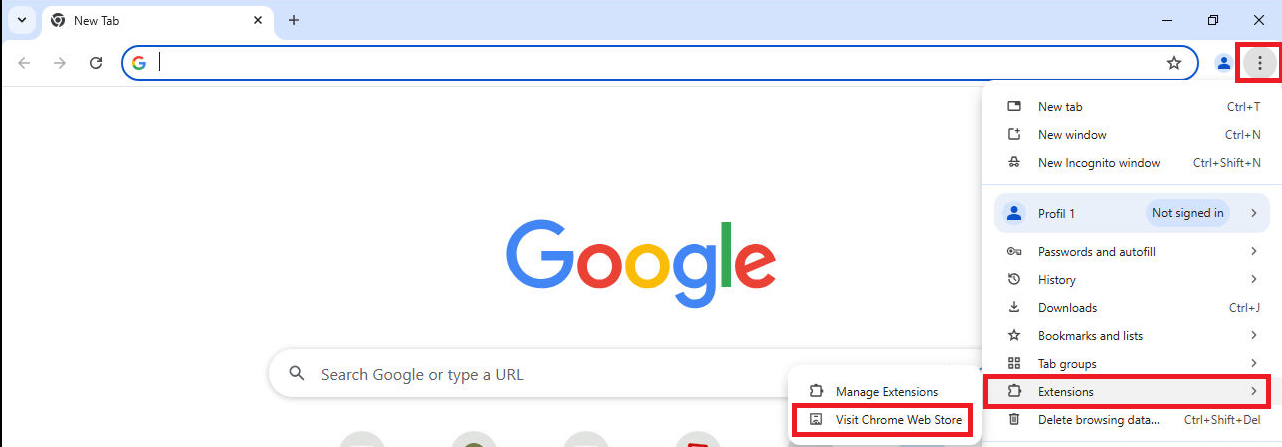
Open Google Chrome and click on the three dots in the top-right corner (the Chrome menu).
-
Select the Extensions option.
-
In the submenu, click on Visit Chrome Web Store.
-
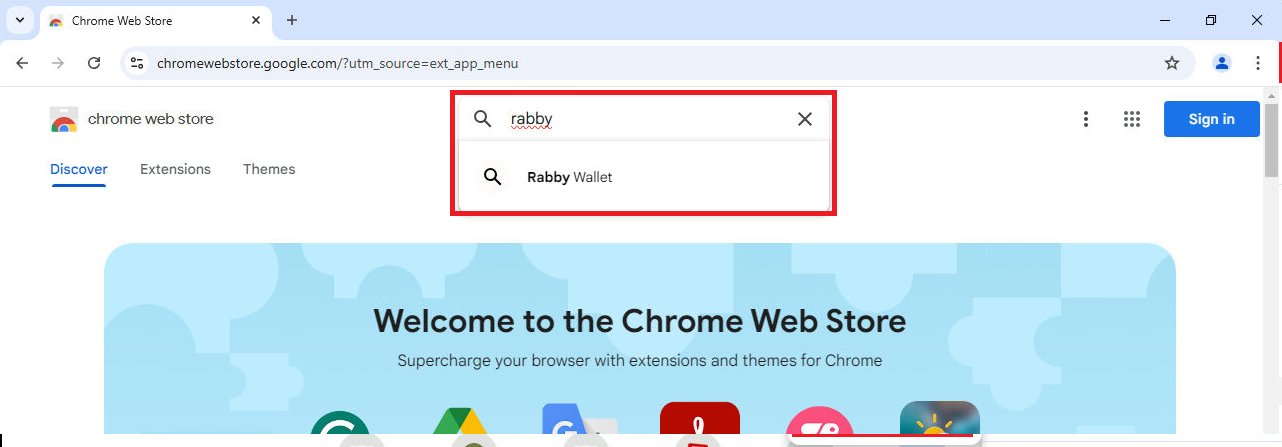
In the Chrome Web Store’s search bar (as shown in the screenshot), type “Rabby.”
-
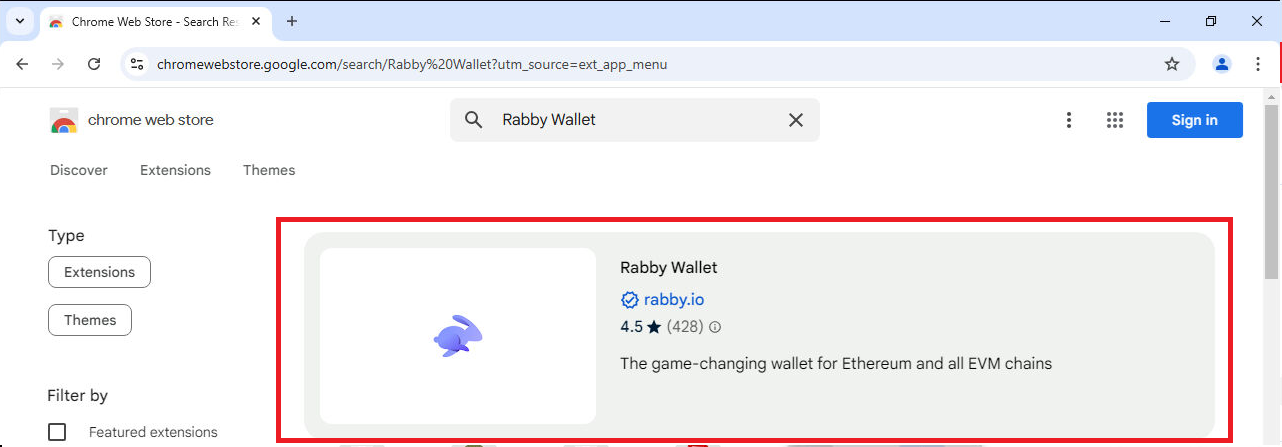
Select Rabby Wallet from the dropdown results to access the extension page.
-
Look for Rabby Wallet in the search results (the purple rabbit icon).
-
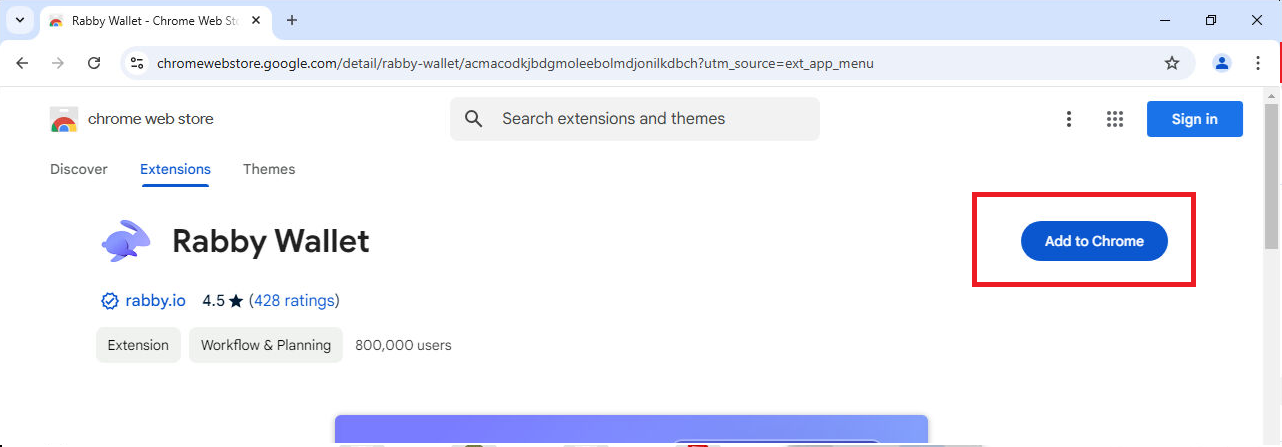
Click on Rabby Wallet to open its extension page, where you can read more details before adding it to Chrome.
-
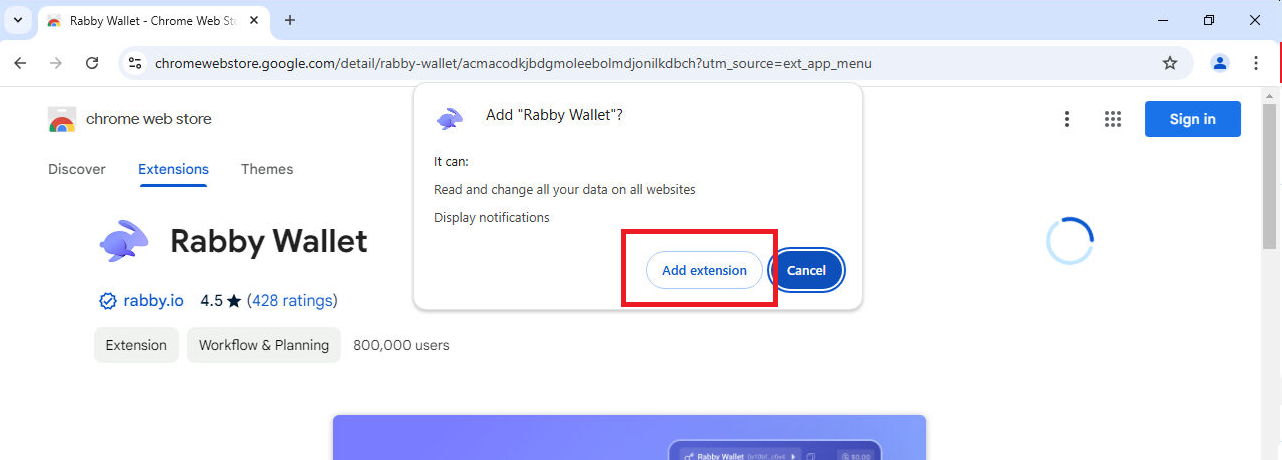
On the extension’s page, click Add to Chrome.
-
Confirm the installation by selecting Add Extension in the pop-up prompt.
-
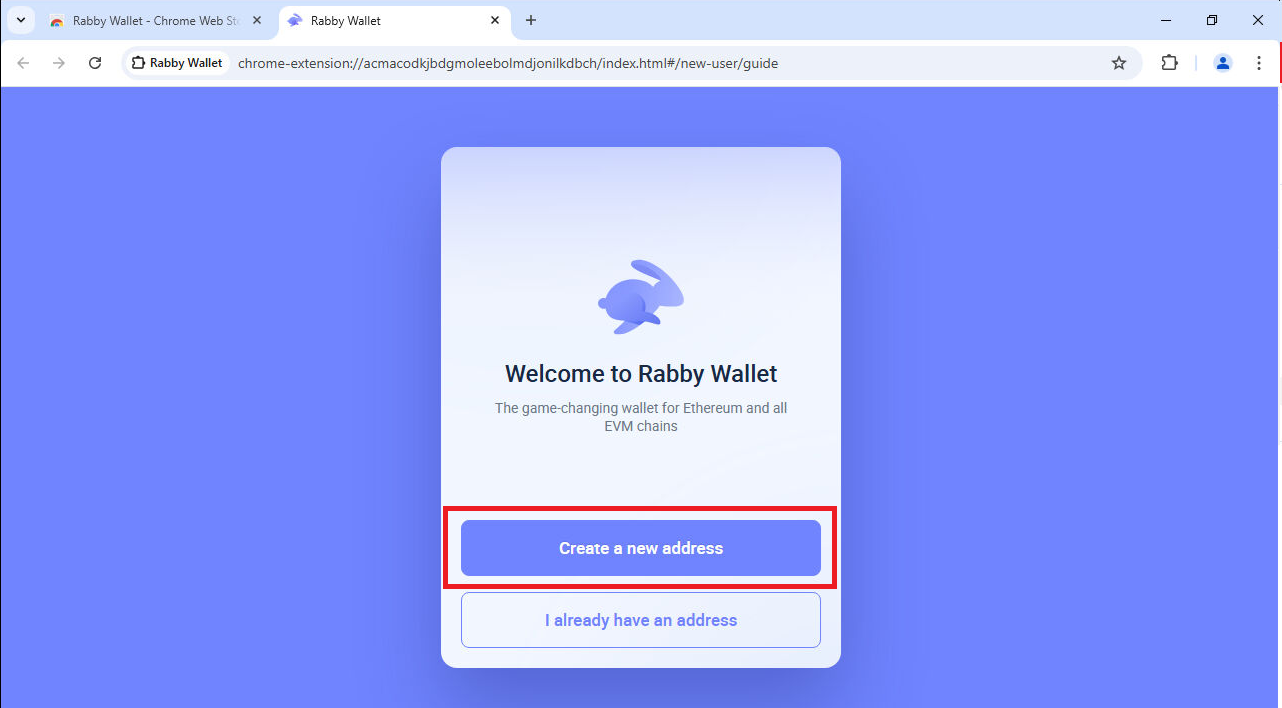
After installing Rabby Wallet, you’ll see a welcome screen.
-
Click Create a new address to generate a fresh wallet address.
-
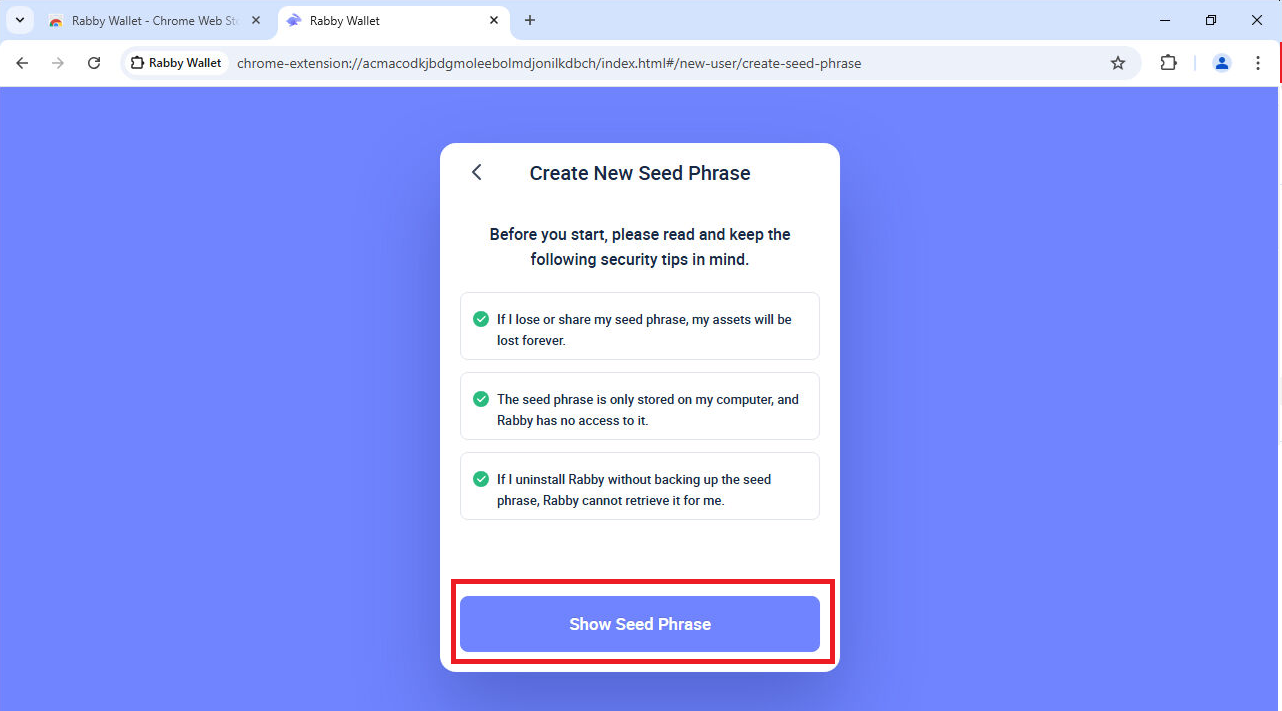
You’ll see important security tips on the screen.
-
Ensure no one can see your screen now
-
Click Show Seed Phrase to reveal your new seed phrase.
-
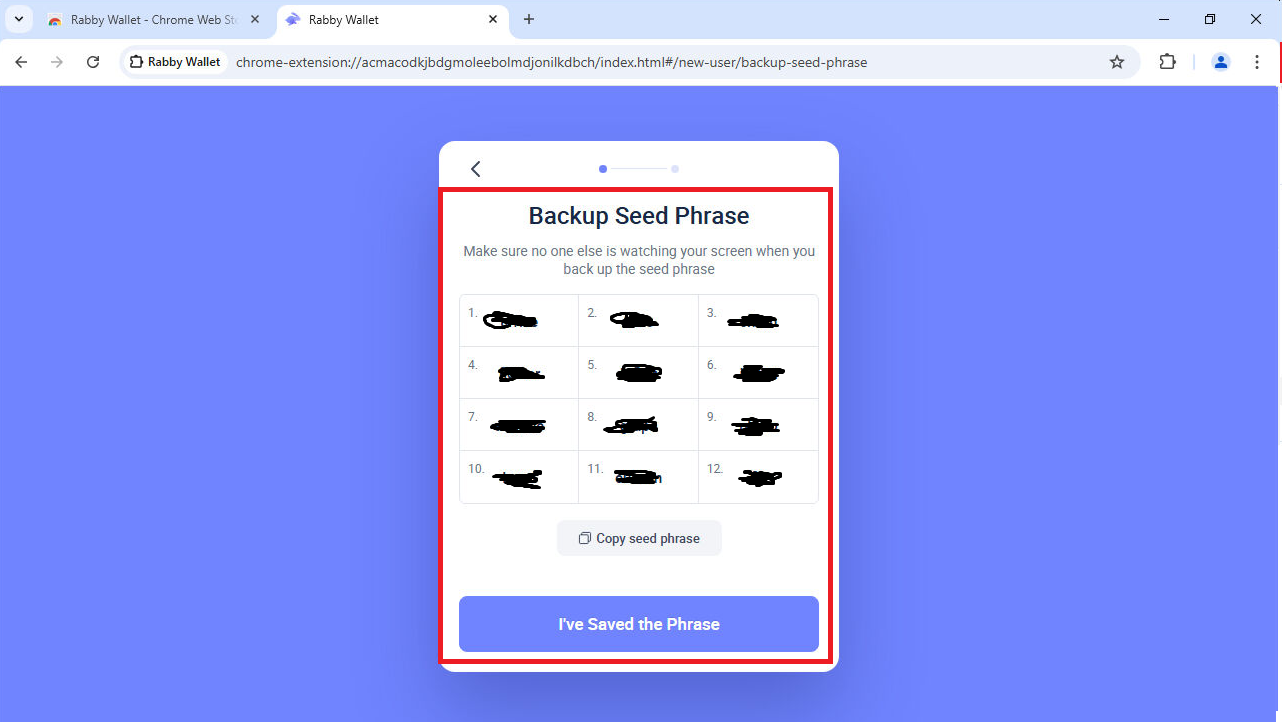
Important: Write down your seed phrase and store it securely offline. Never share it with anyone!
-
Carefully write down or copy your 12-word seed phrase somewhere safe and offline.
-
Once you have securely stored your seed phrase, click I’ve Saved the Phrase to proceed.
-
Enter a strong password in the Password field.
-
Re-enter the same password in the Confirm Password field.
-
Click Confirm to finalize your wallet setup.

-
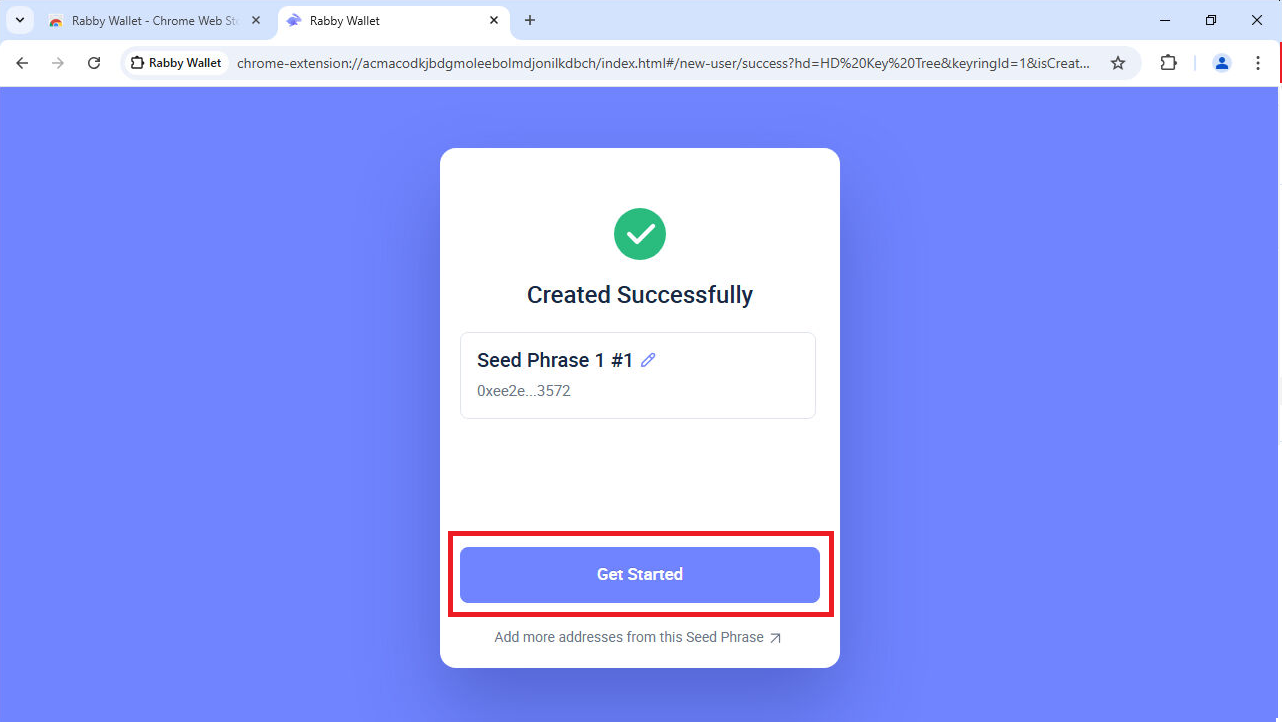
Once the wallet creation process is complete, you’ll see a success message confirming that your wallet is ready. Click Get Started
-
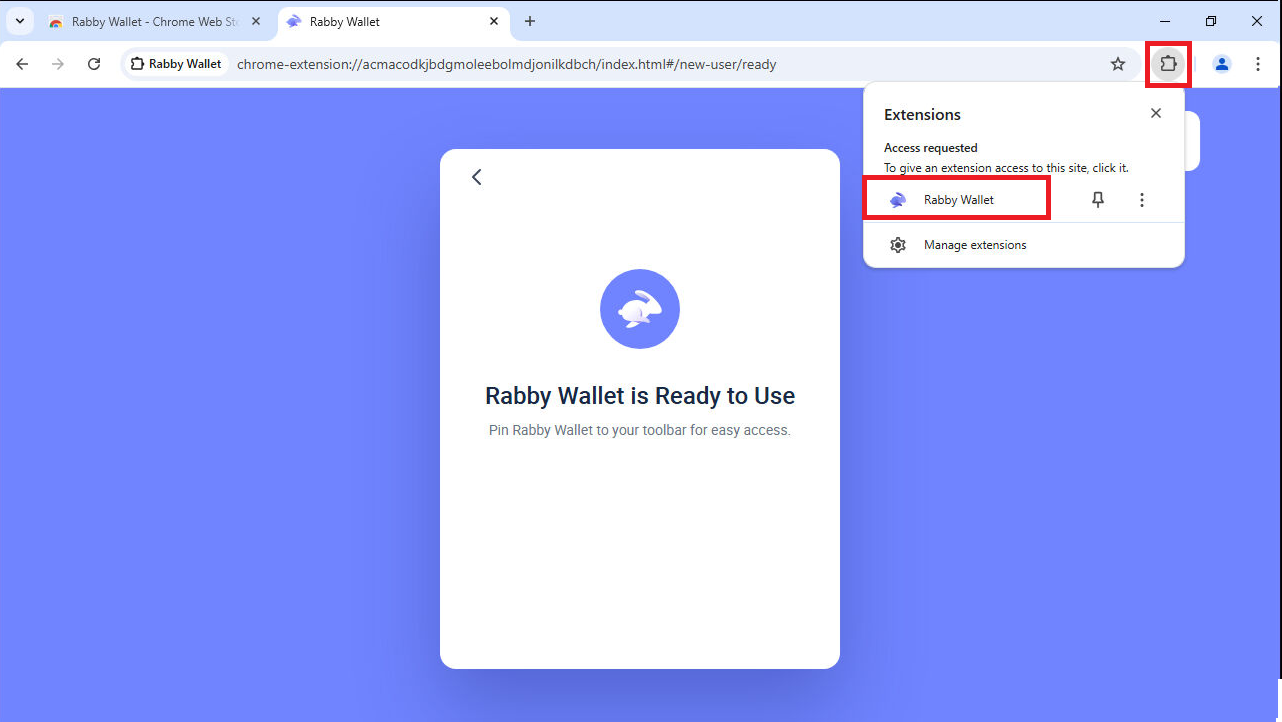
Click the extensions (puzzle piece) icon in the top‐right corner of Chrome.
-
Locate Rabby Wallet in the dropdown list. Click on it.
-
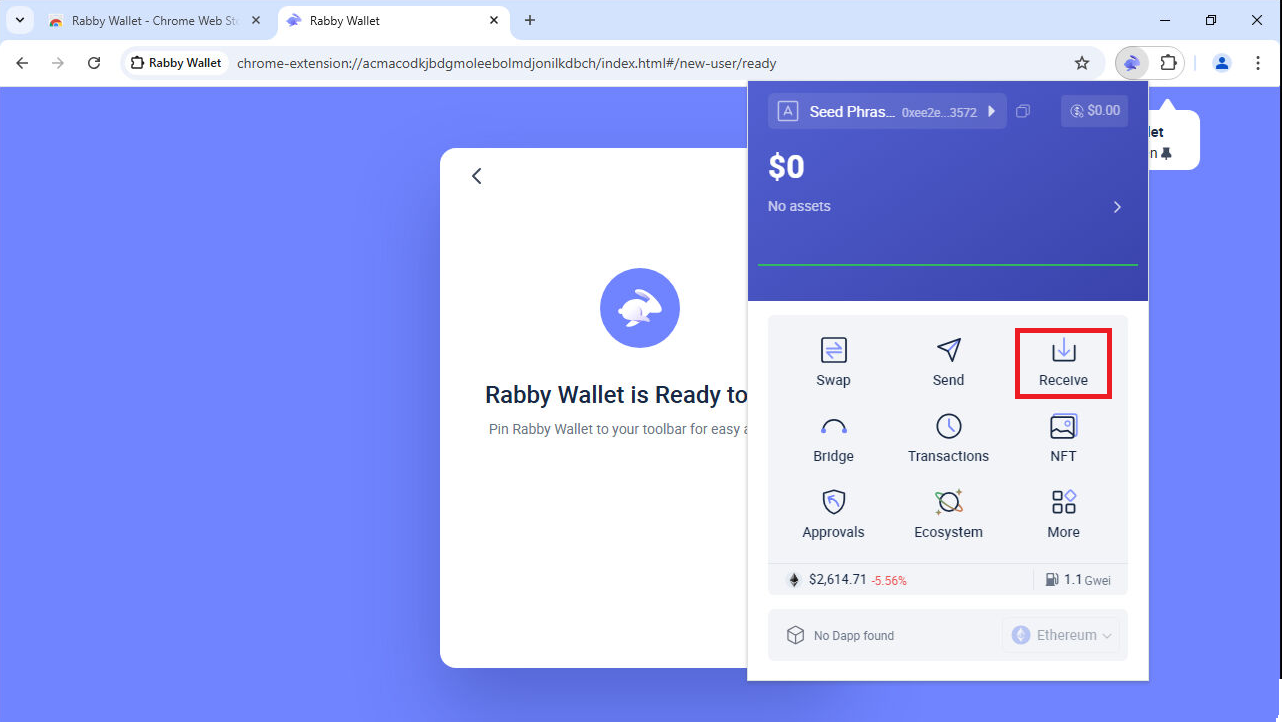
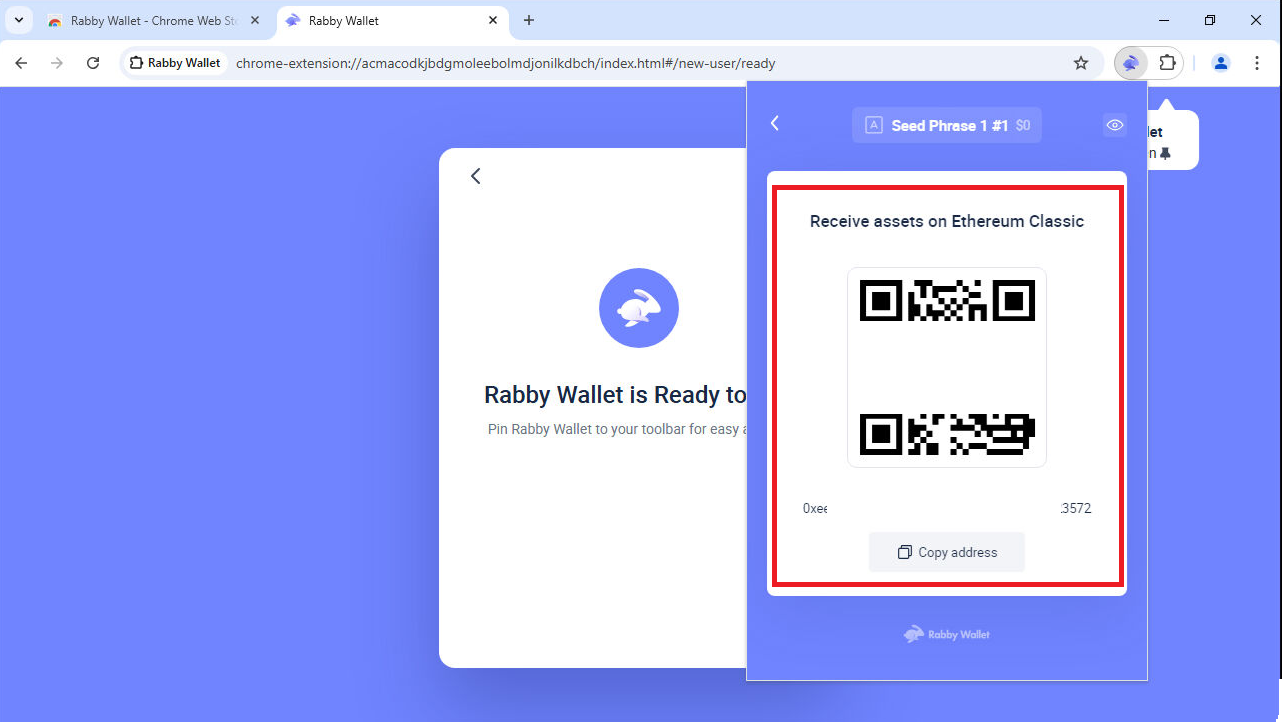
In the wallet menu, select Receive.
-
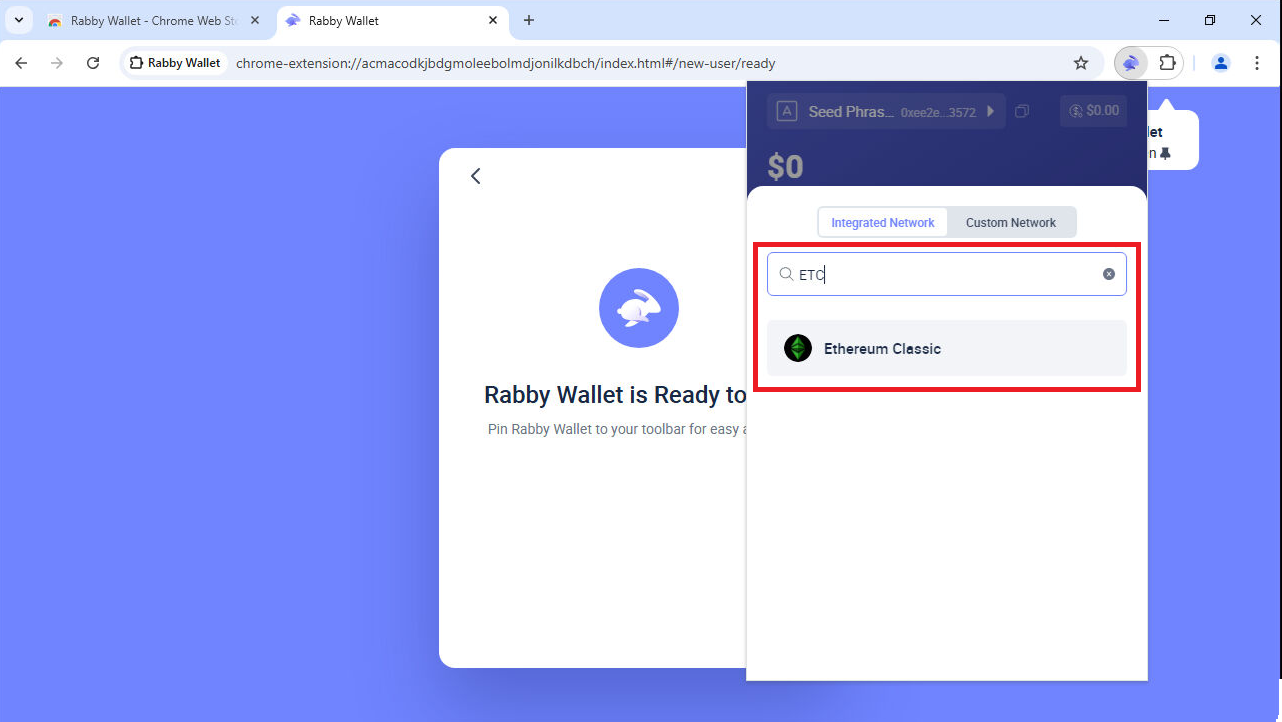
Type “ETC” in the search field. (under Integrated Network)
-
Select Ethereum Classic from the list of networks to switch your wallet to the ETC chain.
-
After switching to Ethereum Classic, your Rabby Wallet will display a Receive screen with a QR code.
-
Copy your ETC address or scan the QR code to deposit Ethereum Classic (ETC) from another wallet or an exchange.
Note: You need ETC so that you can swap it for ETCPOW, which is then required to purchase a node license and for claiming stake later.
-
Always double-check you’re sending funds on the Ethereum Classic network to avoid any loss.
-
Once your deposit has been confirmed on the Ethereum Classic blockchain, your Rabby Wallet will display the balance in approximate USD.

2. Swap ETC for ETCPOW 🔗
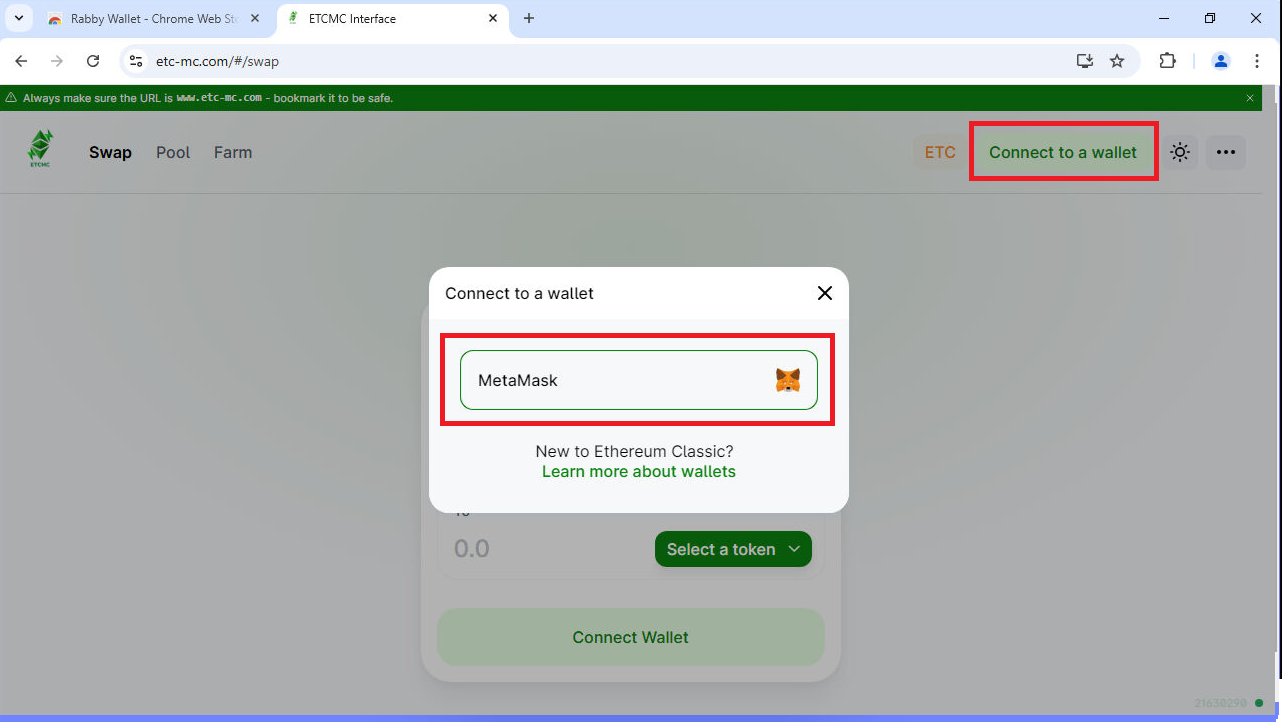
- Open ETCMC Swap in your Chrome browser.
- In the top-right corner, click Connect to a wallet. A popup will appear asking you to choose a wallet. Click on MetaMask.
Note: There is no functional difference whether you use MetaMask or Rabby Wallet for this process. Both options will allow you to connect to the Ethereum Classic network.
-
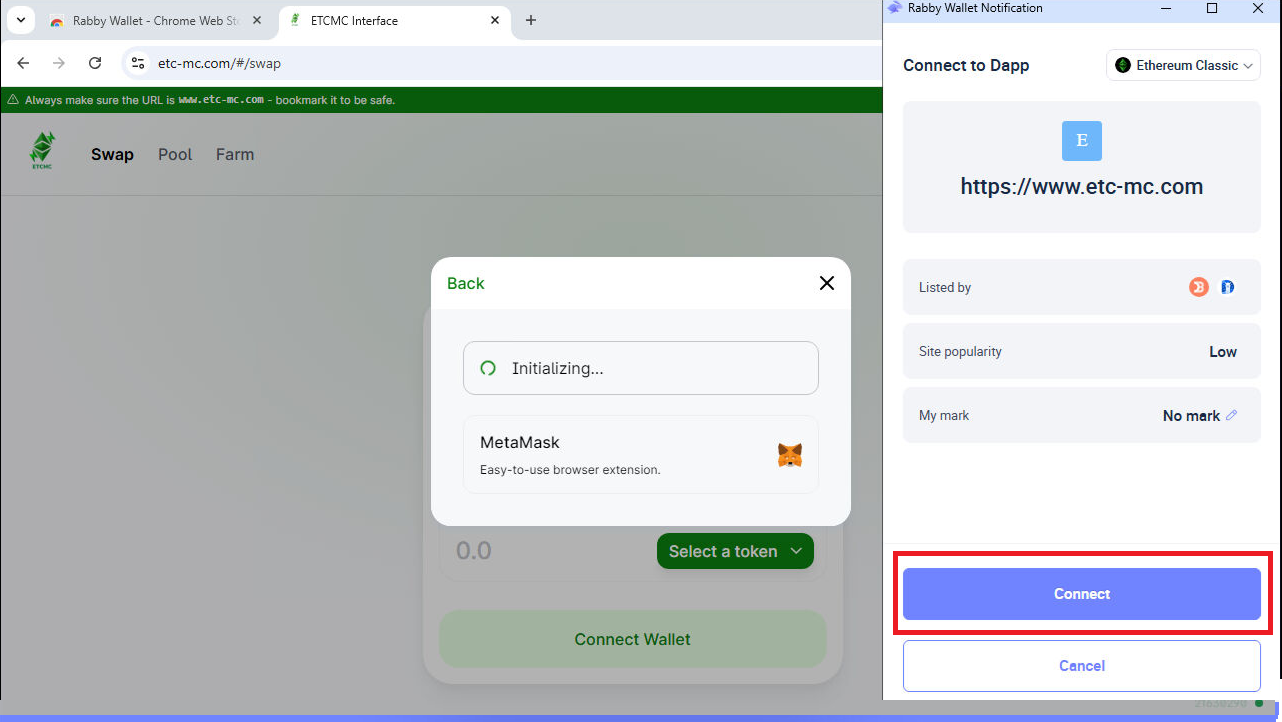
If you chose Rabby Wallet instead of MetaMask, the Rabby notification window will pop up on the right.
-
Verify the website address (in this case, https://www.etc-mc.com) is correct.
-
Click Connect in the Rabby Wallet notification window to authorize the connection.
-
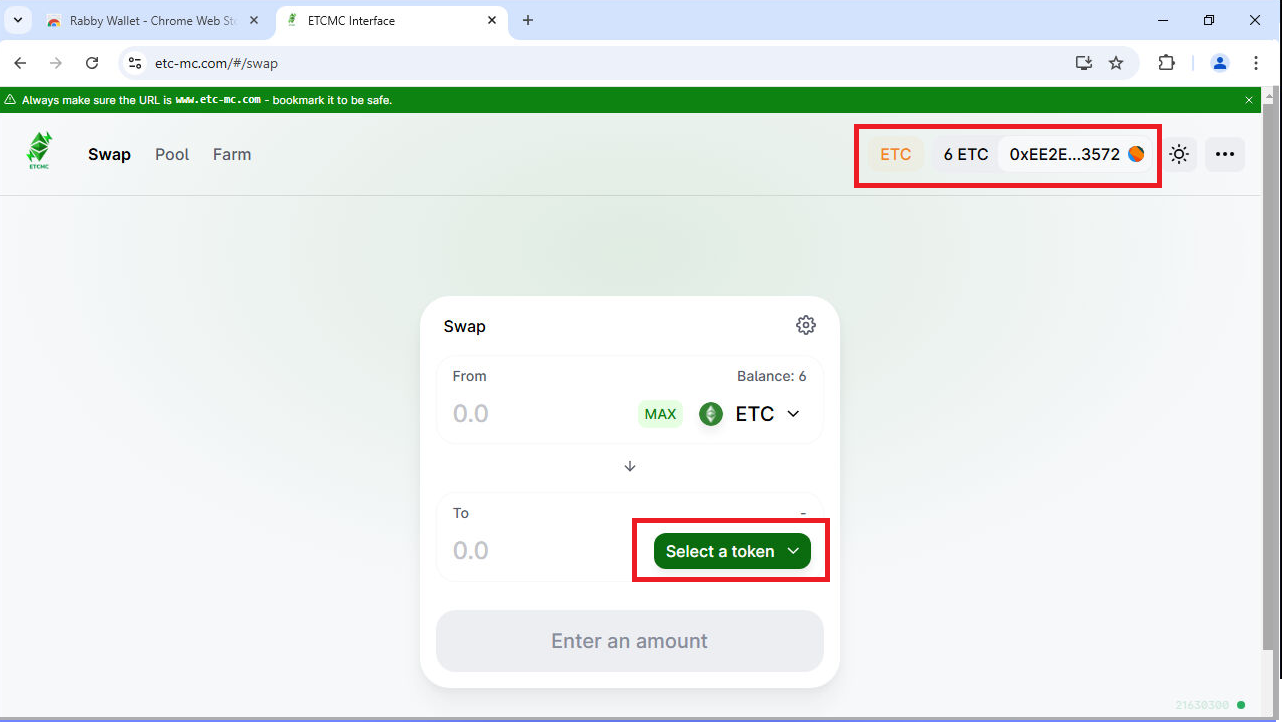
Verify that you’re connected to the Ethereum Classic network and that your ETC balance (e.g., 6 ETC) is displayed at the top right.
-
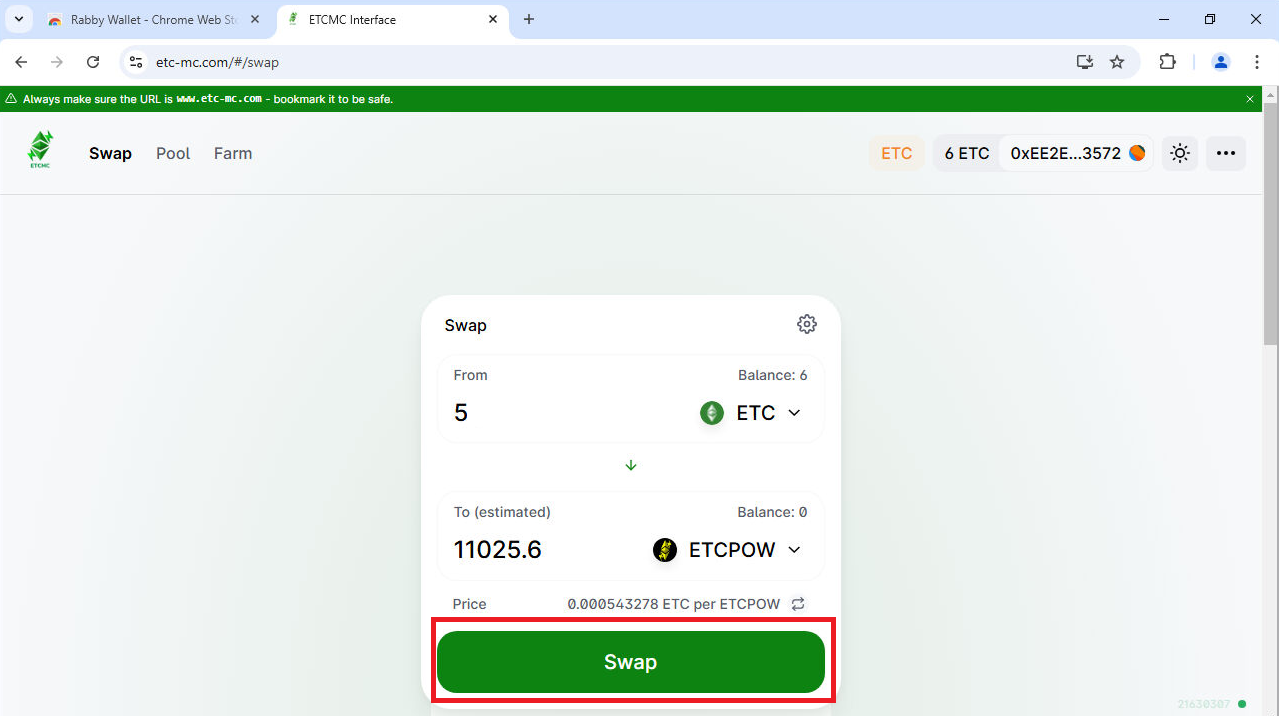
In the Swap interface, the “From” field should automatically show ETC along with your current balance.
-
Click Select a token in the “To” field.
-
Choose ETCPOW from the list.
-
Specify the amount of ETC you want to swap, making sure you leave some ETC in your wallet to cover transaction fees (gas).
-
Review the estimated amount of ETCPOW you will receive.
-
Click Swap to initiate the transaction.
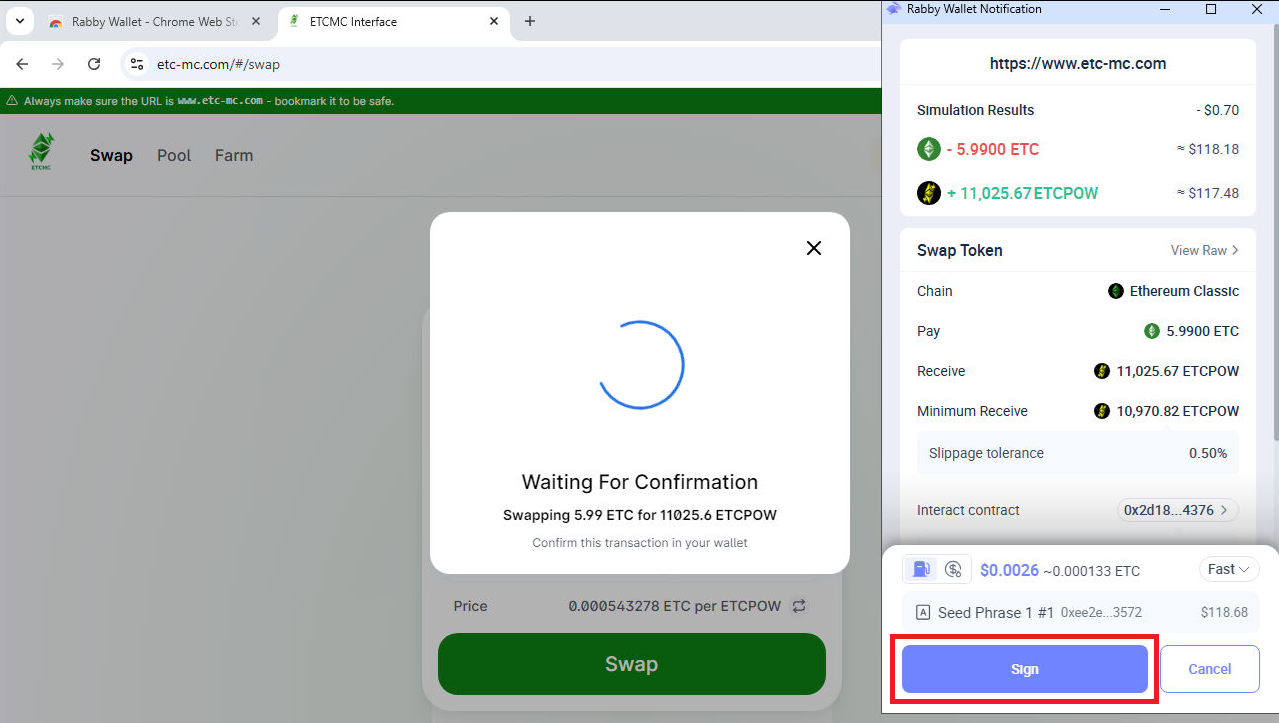
-
A Rabby Wallet notification will pop up on the right, displaying your swap details (amount of ETC, amount of ETCPOW, slippage, etc.).
-
Double‐check the chain is Ethereum Classic, and verify the swap amount and minimum receive amount.
-
If everything looks correct, click Sign to authorize the transaction.
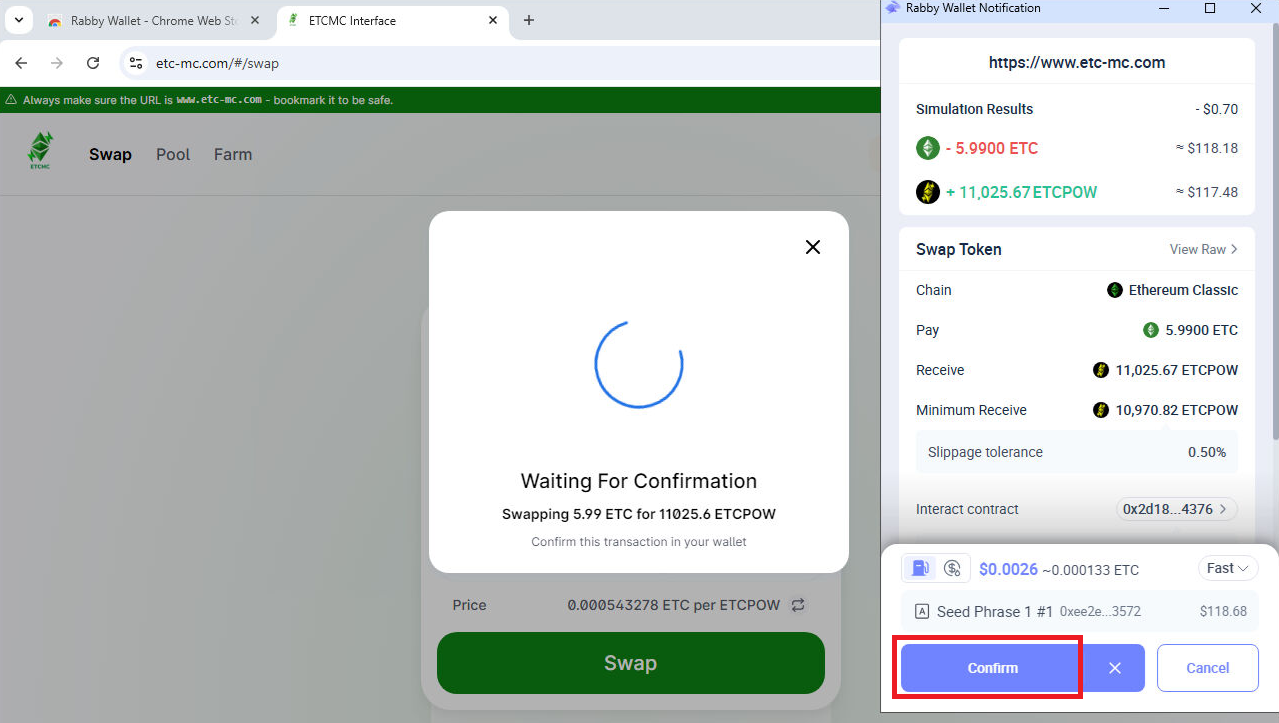
-
If everything looks correct, click Confirm.
-
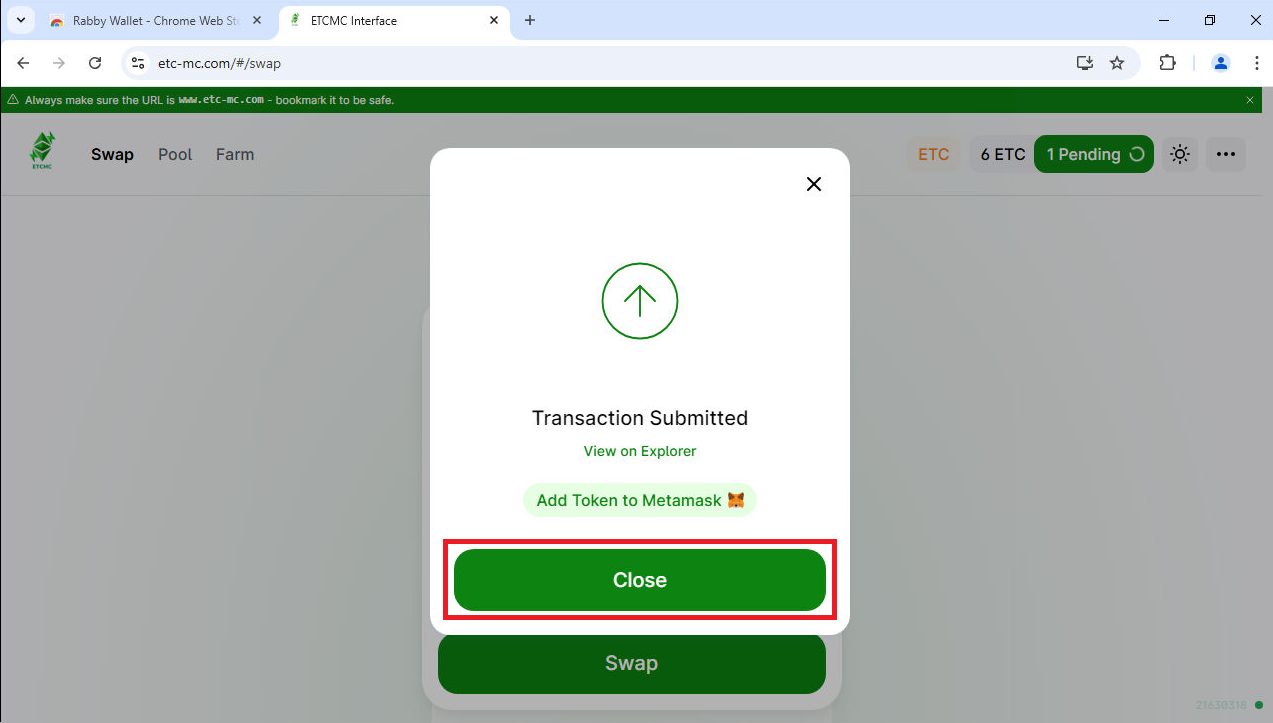
Once you see the “Transaction Submitted” message, you know your swap request has been broadcast to the Ethereum Classic network.
Note: If you’re using MetaMask, you can click Add Token to MetaMask to easily display your new ETCPOW balance in your wallet.
- Finally, click Close to exit the confirmation window.
-
Keep an eye on your Rabby Wallet balance. After the network confirms the transaction, your ETCPOW tokens will appear.
3. Buy a Node License from the Marketplace 🔗
-
Open https://marketplace.etcmc.org/ in your Chrome browser.
-
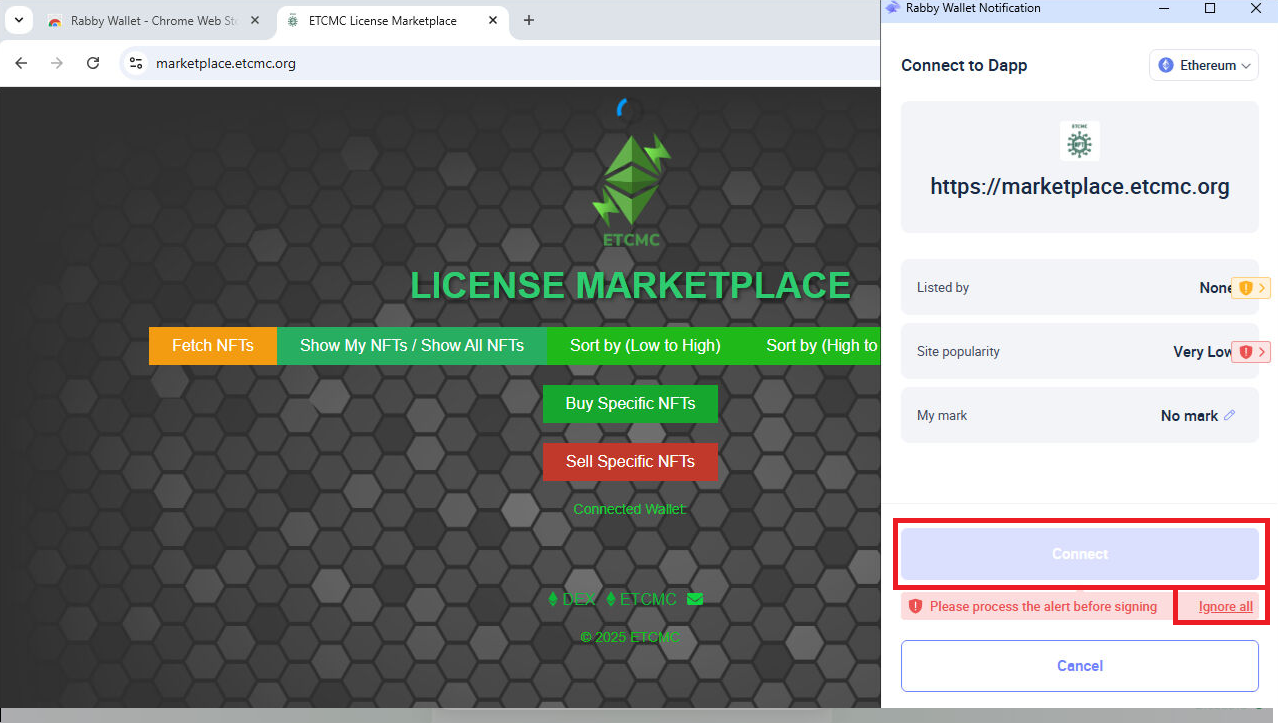
If the Rabby Wallet pop‐up doesn’t appear automatically, click Connect Wallet (in the top‐right area) on the License Marketplace site.
-
In the Rabby Wallet notification, make sure you’re on Ethereum Classic (not Ethereum, like shown in the Screenshot).
-
If you see any extra warnings (like “Please process the alt before signing”), you can typically click Ignore All to continue.
-
Once you’re ready, click Connect in the Rabby Wallet pop‐up to authorize and link your wallet to the marketplace.
-
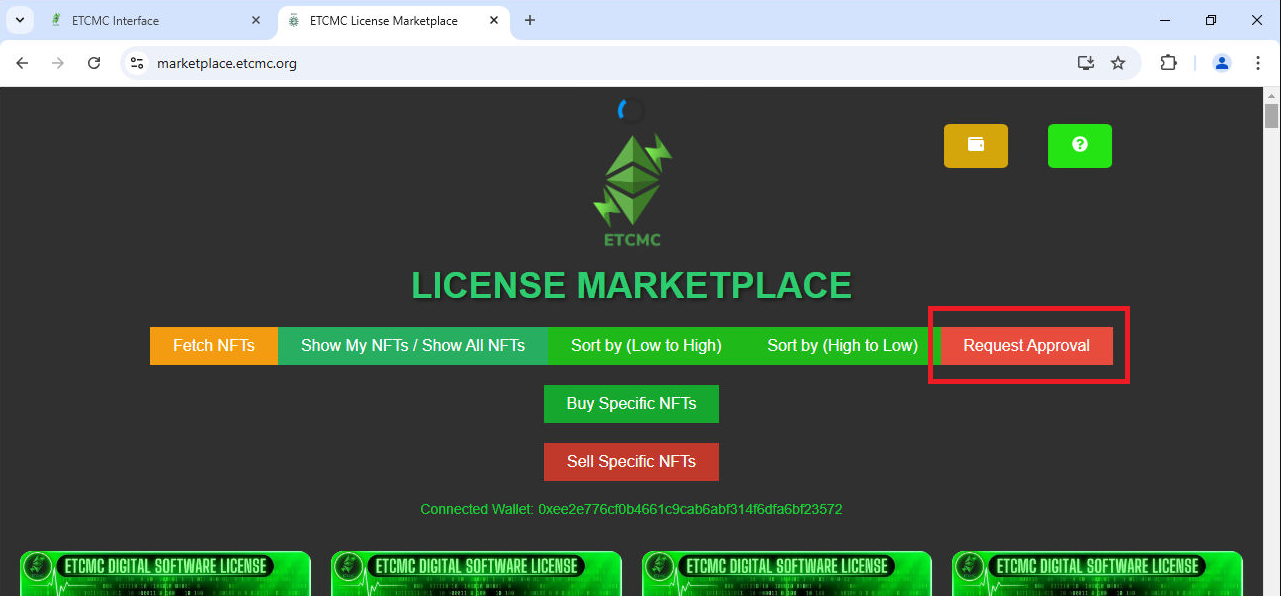
To proceed with purchasing a license, click on Request Approval.
-
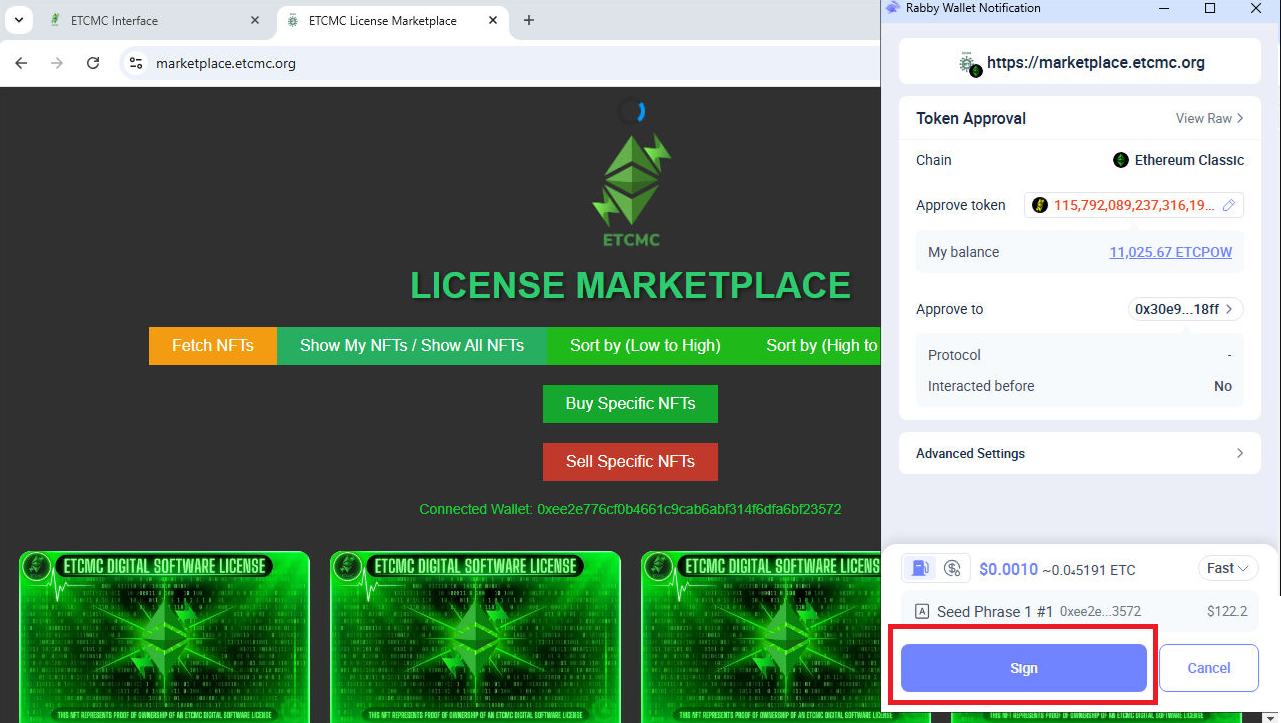
After clicking Request Approval, a Rabby Wallet Notification will appear, asking for token approval.
-
Verify that you are on the Ethereum Classic network and that the token being approved is ETCPOW.
-
If everything looks correct, click Sign and Confirm to authorize the marketplace to use your ETCPOW for purchasing a node license.
-
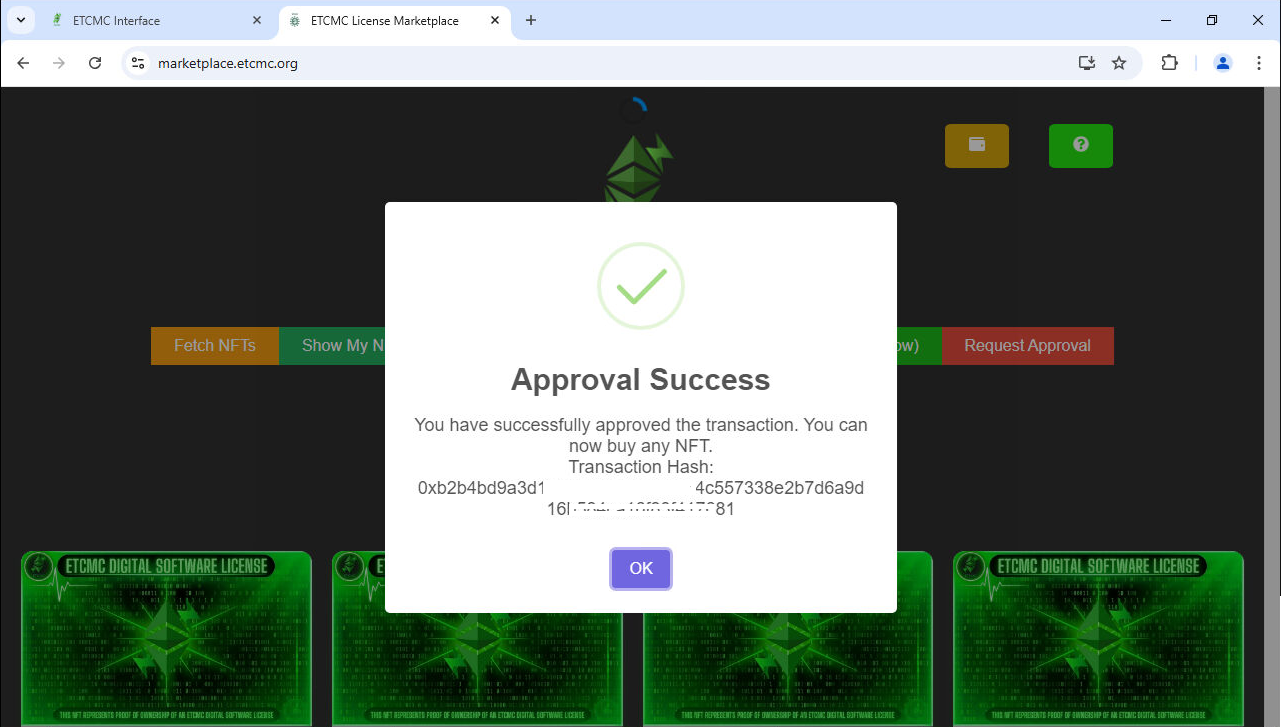
Once the approval transaction is confirmed, you will see a Success Message on the marketplace.
-
Click OK to close the confirmation window and continue to the next step.
-
Wait a moment for all available License NFTs to load on the marketplace.
-
Click Sort by (Low to High) to find the cheapest license available.
-
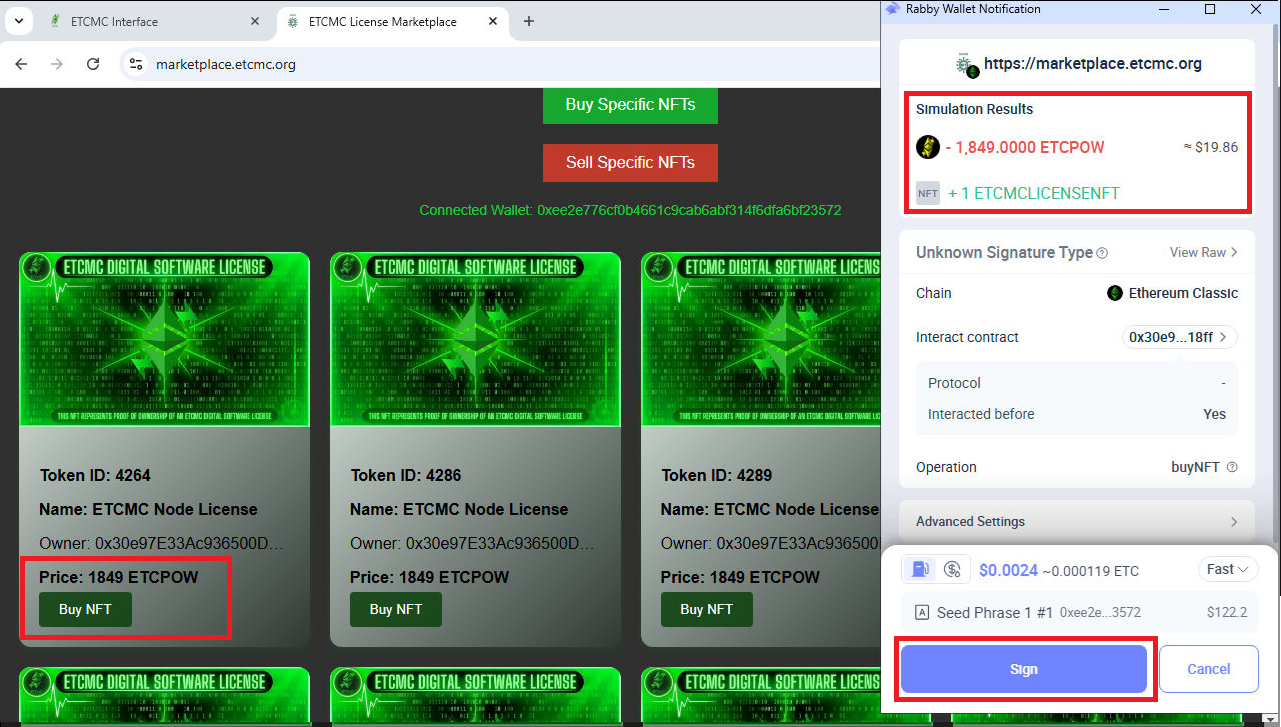
Click Buy NFT on the lowest-priced license (in this case, 1849 ETCPOW).
-
A Rabby Wallet Notification will pop up on the right, showing transaction details.
-
If everything looks correct, click Sign and Confirm to confirm the purchase.
-
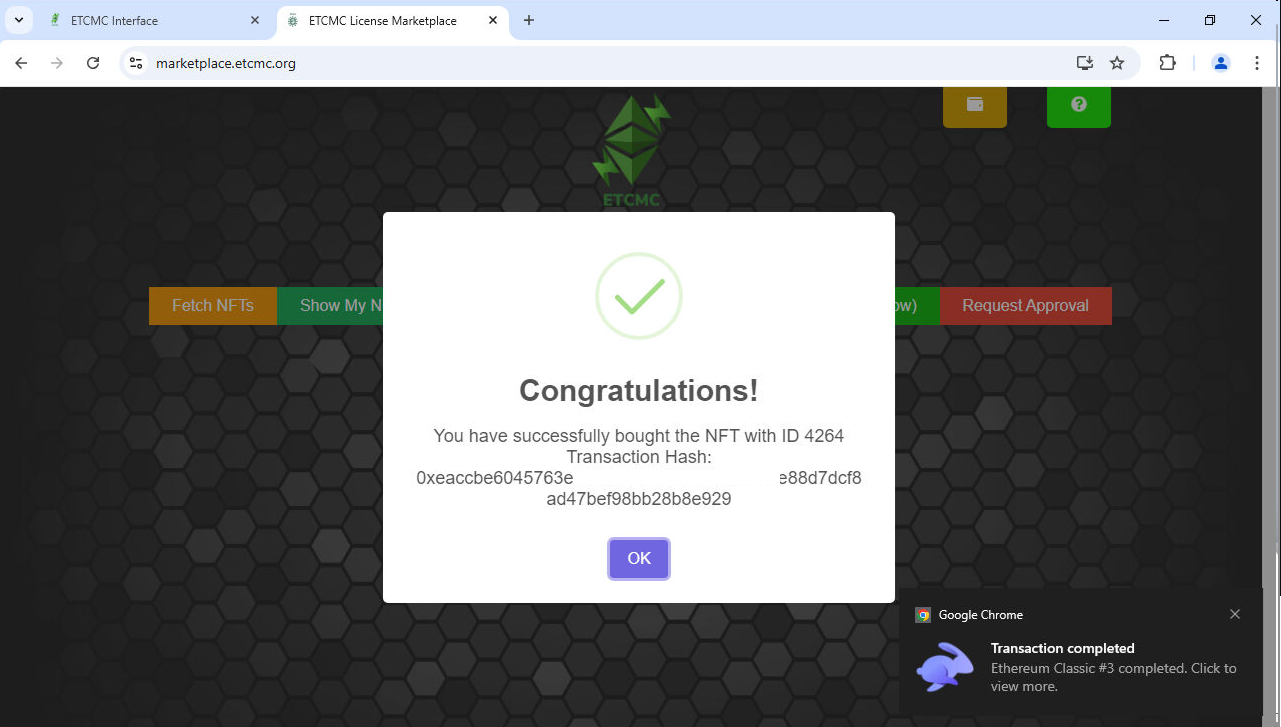
Once your transaction is successful, you will see a confirmation message.
-
The message will display the NFT ID (in this case, 4264). Make sure to write this ID down as it will be needed later.
-
Click OK to close the confirmation window.
Optional Step: Verify Your NFT in Rabby Wallet
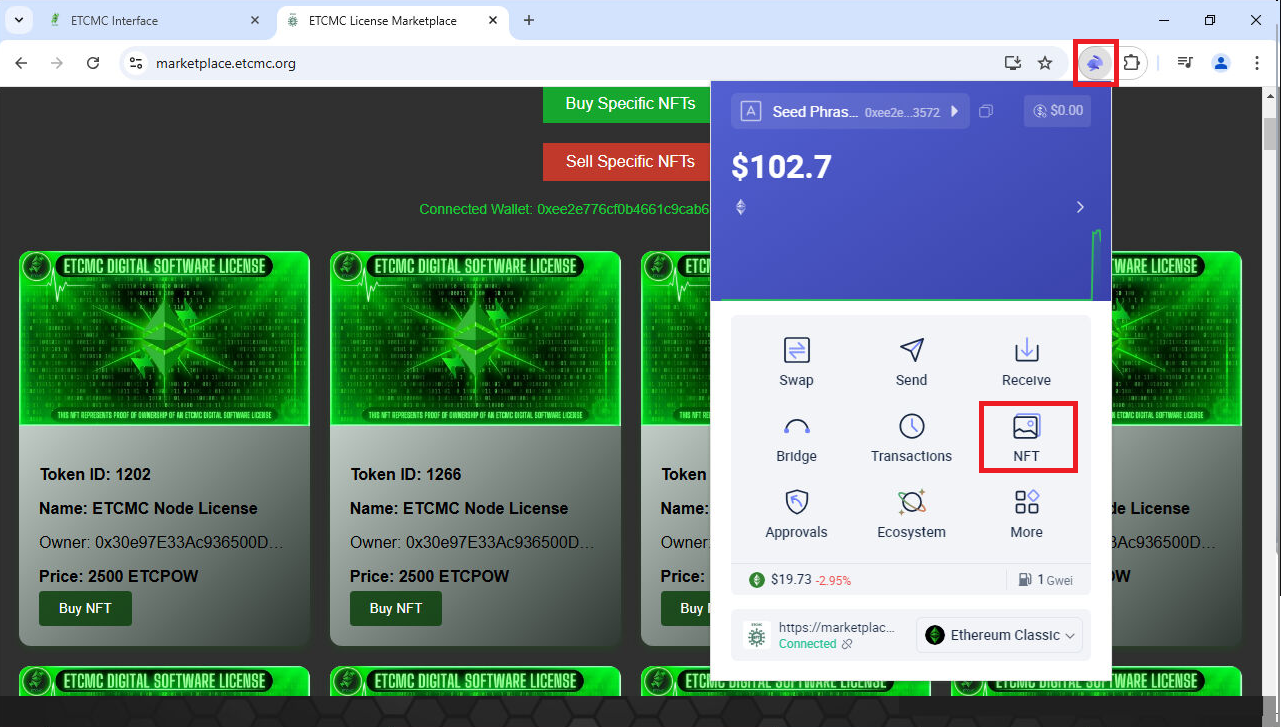
- Open Rabby Wallet by clicking on its icon in your browser toolbar.
- In the wallet menu, click on the NFT section.
- Here, you can check if your ETCMC License NFT has successfully arrived in your wallet.
-
If you don’t see it immediately, wait a few minutes and refresh the wallet.
4. Install ETCMC Client on Windows 🔗
-
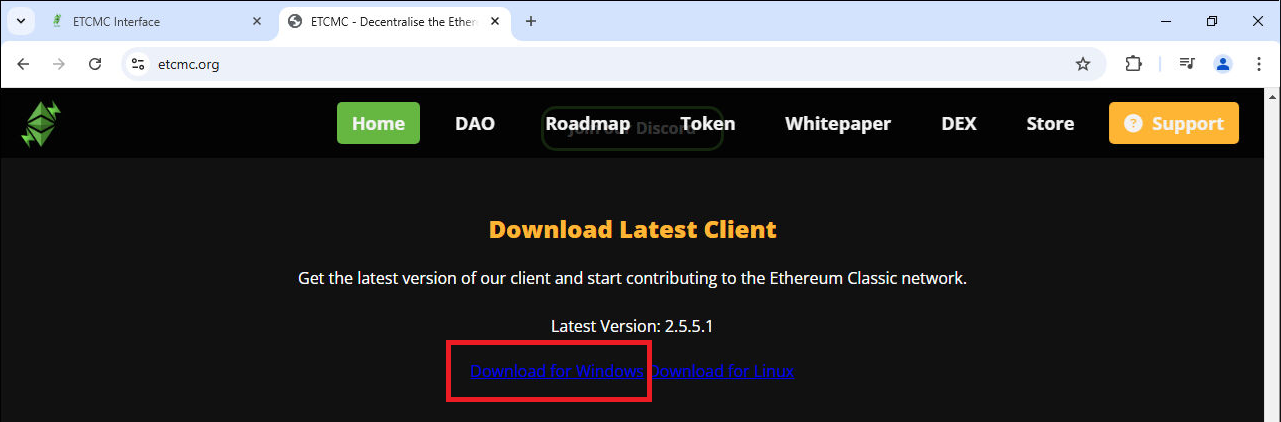
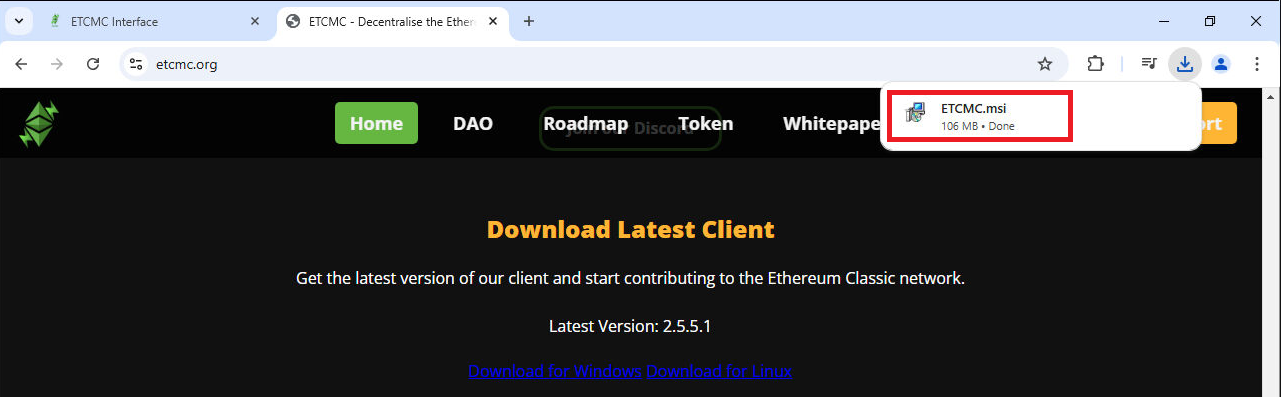
Visit https://etcmc.org to access the latest client
-
Scroll down to the bottom of the Page and Click Download for Windows
-
Once the download is complete, you should see it in the browser’s download section (as shown in the image, ETCMC.msi).
-
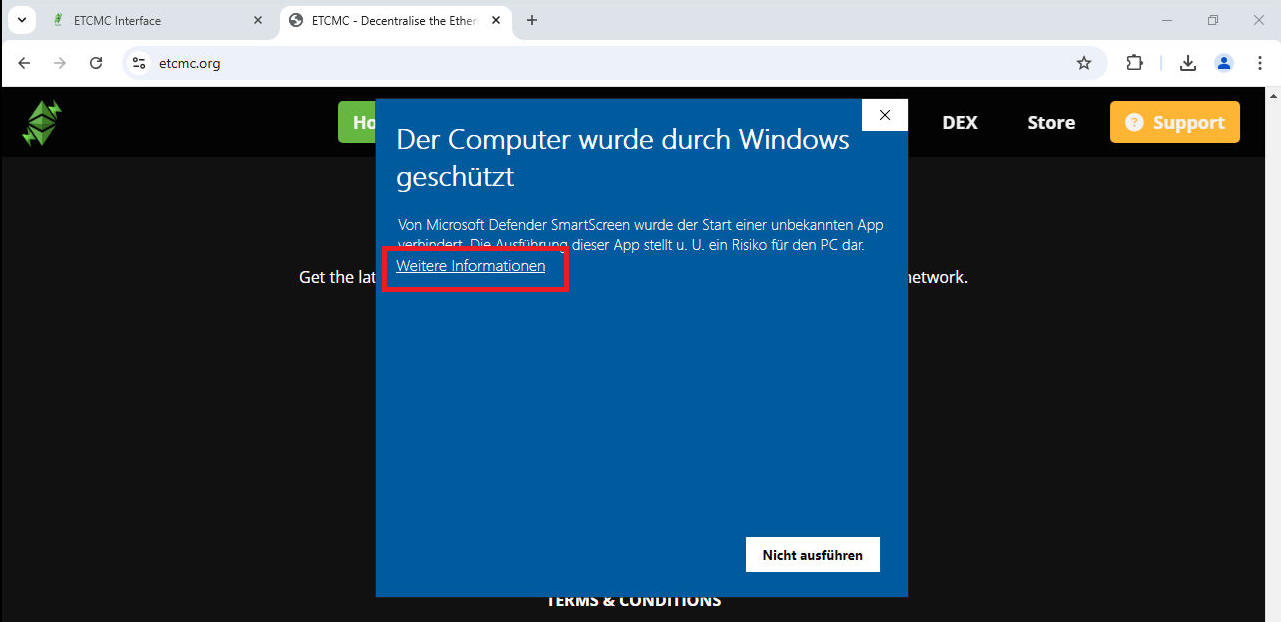
Click on the downloaded file to begin the installation process.
-
When launching the installer, Windows Defender SmartScreen might block the app since it is from an unknown source
-
To proceed, click on More Information
-
This will reveal additional options, including the ability to run the installer anyway.
-
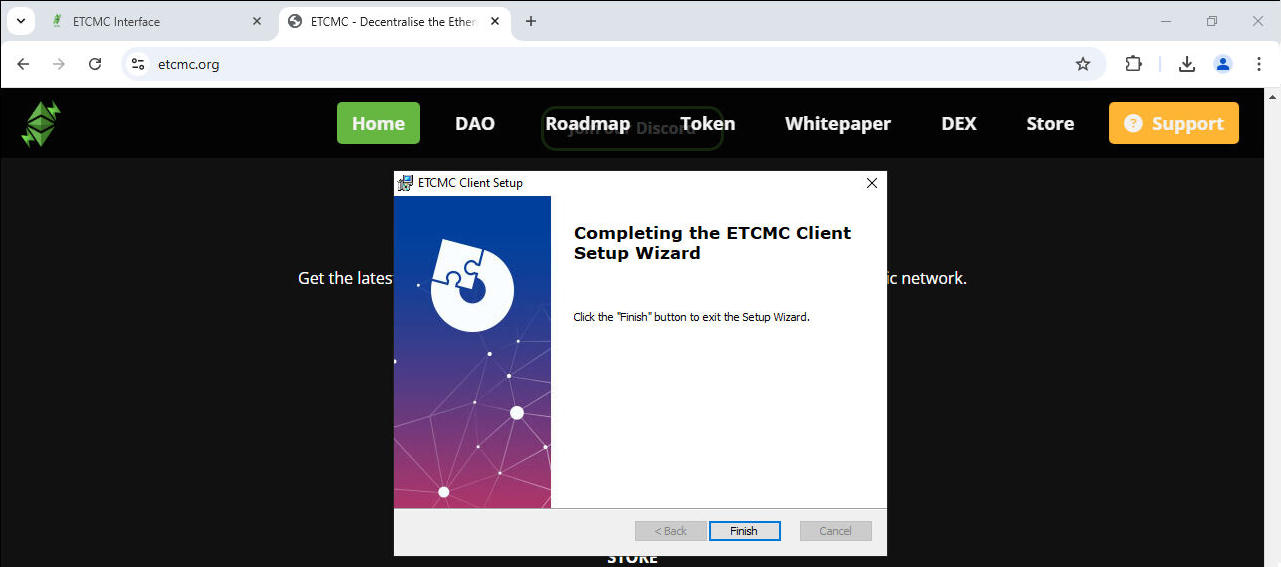
After bypassing Windows Defender, the ETCMC Client Setup Wizard will open.
-
Click Next to proceed with the installation.

-
The installation wizard prompts you to read and agree to the License Terms and Conditions before proceeding.
-
If you agree, check the box "I agree to the License terms and conditions."
-
Click Next to proceed with the installation.

-
The setup process is now complete, Click "Finish" to exit the installer.
5. Start and Register your Node 🔗
-
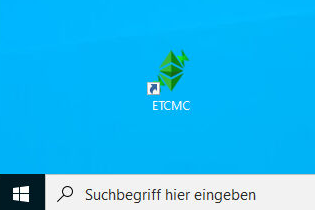
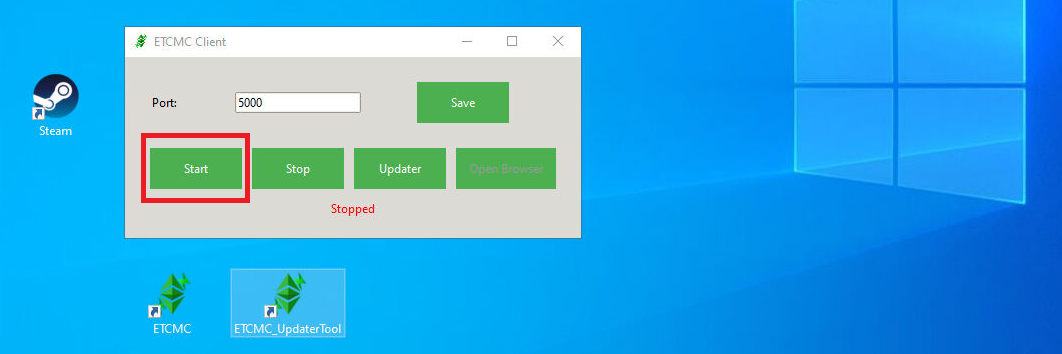
Locate the ETCMC Client shortcut on your desktop and Double-Click.
-
Click the "Start" button to launch the client.
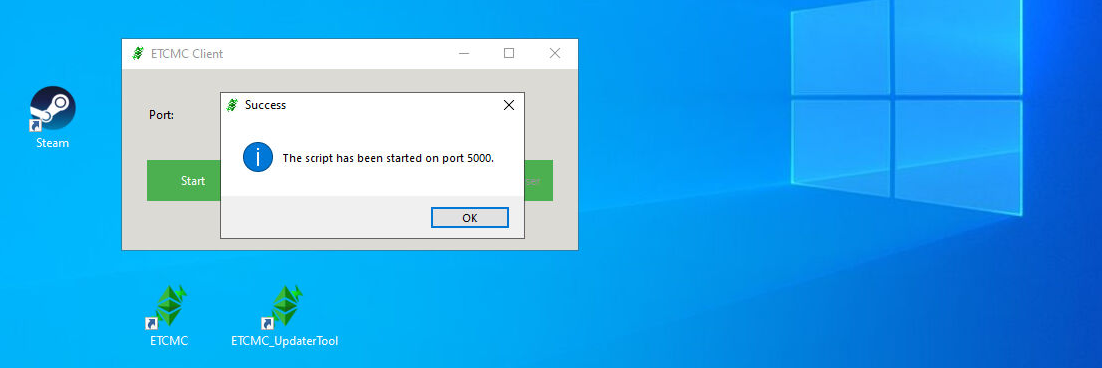
-
After clicking "Start", a popup appears confirming
-
Click "OK" to close the confirmation message.
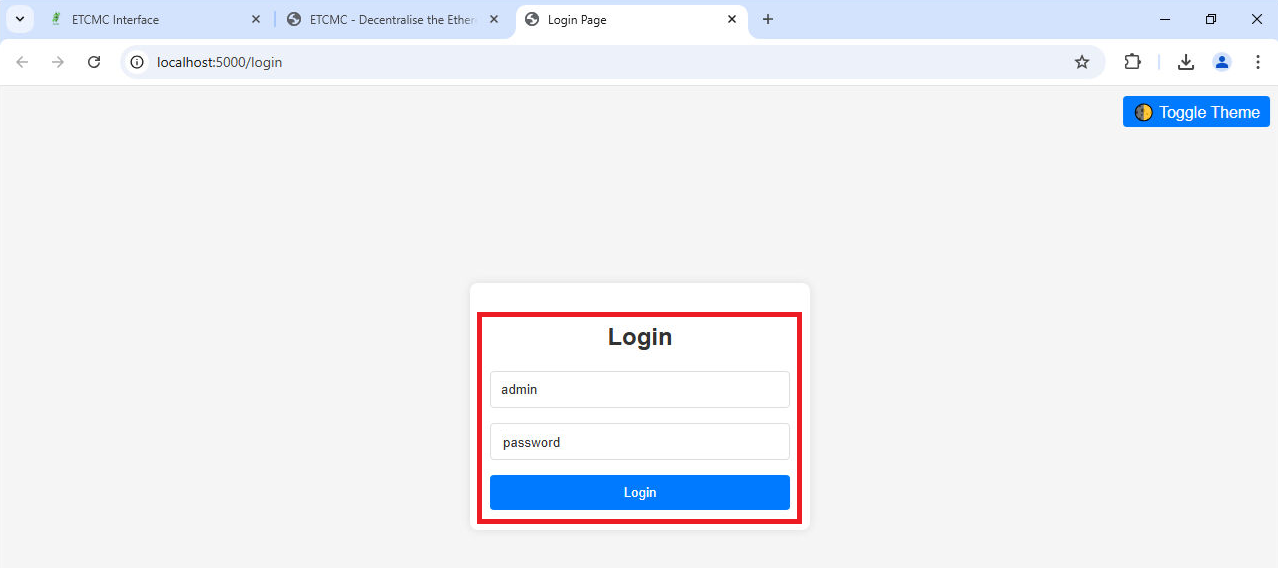
-
The browser opens automatically to localhost:5000/login
-
A login screen appears where you need to enter
Username: admin Password: password
-
Click the "Login" button to proceed.
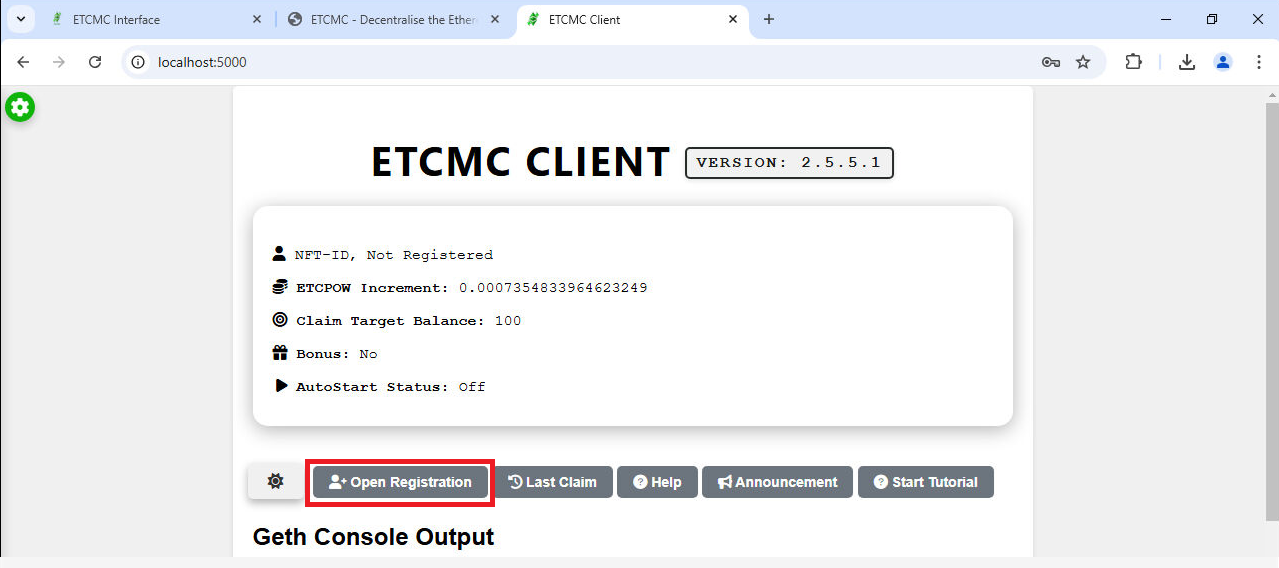
-
The NFT-ID is currently "Not Registered", meaning you need to link your License NFT.
-
Click the "Open Registration" button to proceed
-
Enter your NFT-ID, If you forgot your NFT-ID, visit this page to retrieve it.
-
Input your valid email address in the required field.
-
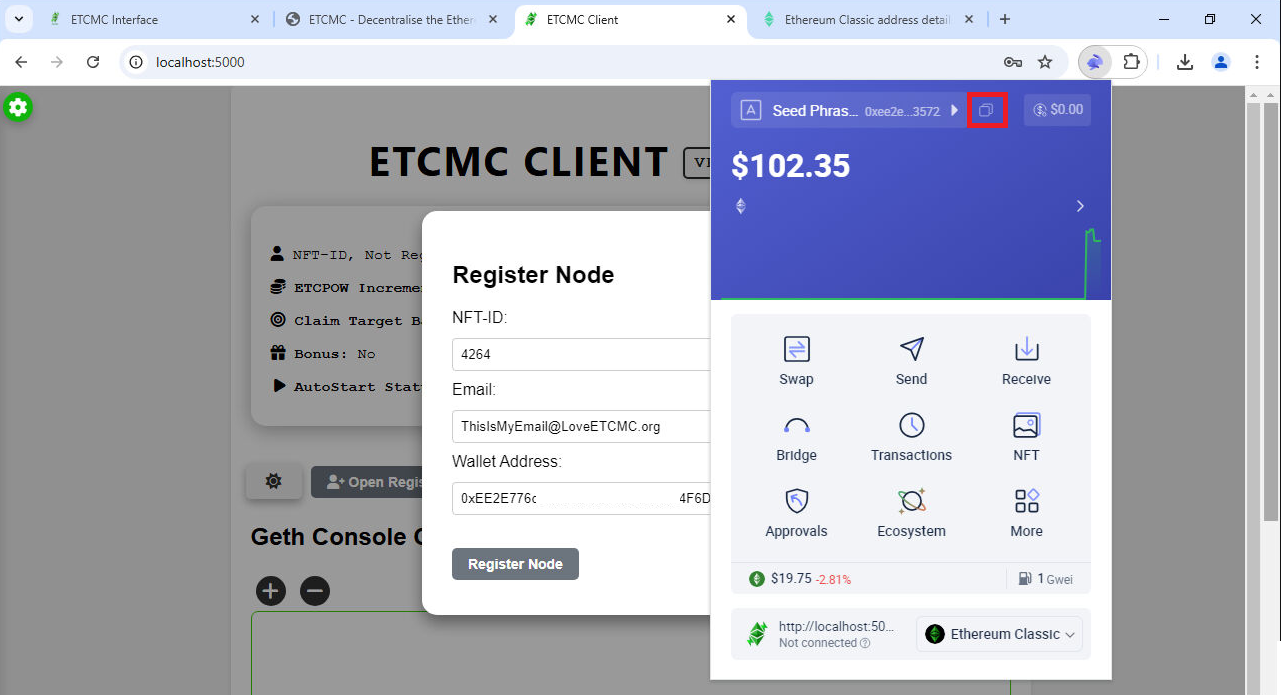
Open Rabby Wallet, Click on the copy address icon (highlighted in the image).
-
Paste the copied wallet address into the "Wallet Address" field in the registration form.
-
Click "Register Node" to finalize the process.
-
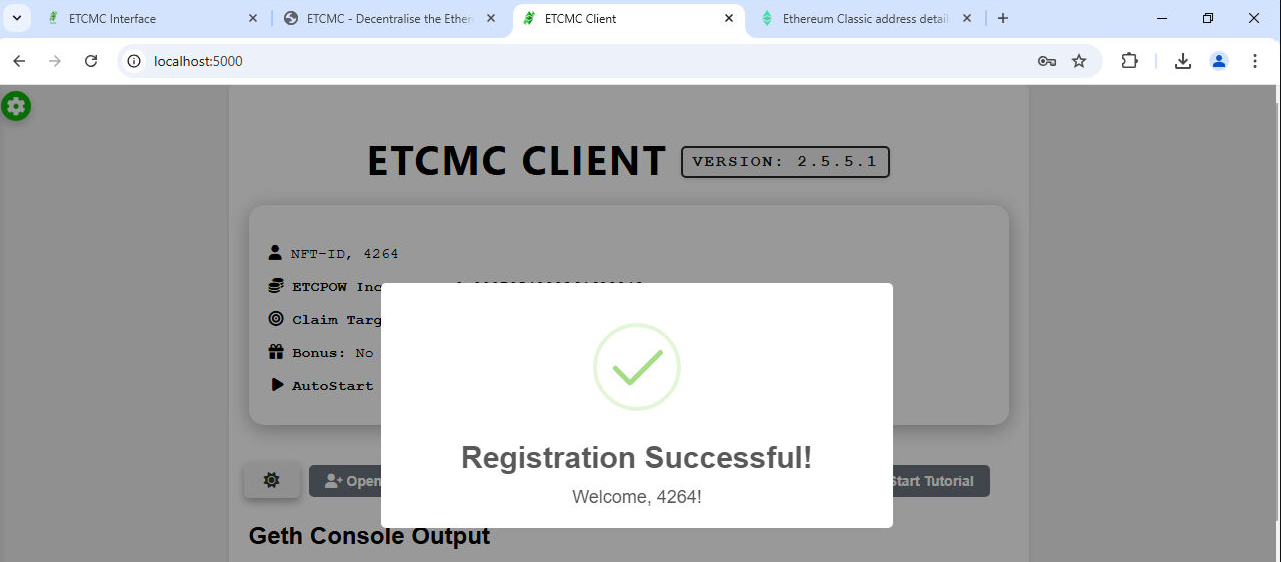
Your node has been successfully registered with the NFT-ID.
🎉 Congratulations! Your ETCMC Node is now set up and ready to go! 🚀
-
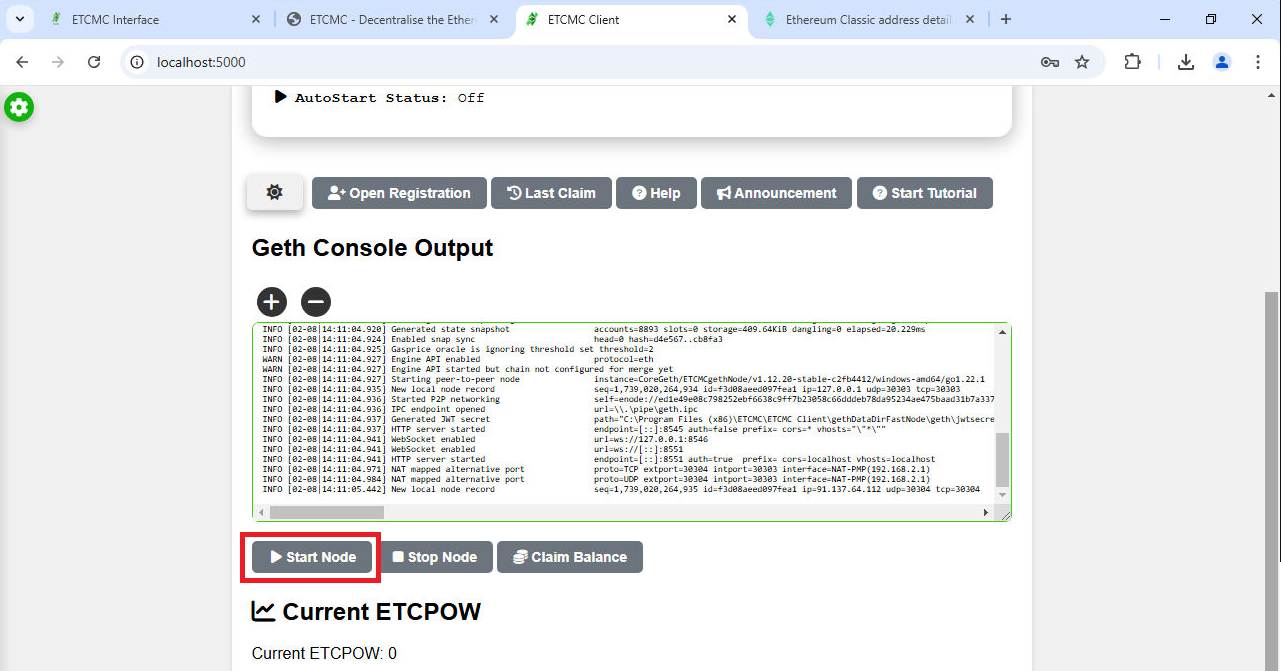
Click on "Start Node" to activate the node.
Important Notes:
🔵 Synchronization can take up to 24 hours, depending on your network speed and computer performance. During this time, the node downloads blockchain data and connects to the network.
🟢 Once synchronization is complete, the node will start earning rewards in ETCPOW.
📢 Tip: Make sure your computer stays powered on and connected to a stable internet connection to ensure a smooth synchronization process! 🚀
6. Stake ETCPOW for Claiming 🔗
Note:
Staking ETCPOW allows users to secure rewards while helping stabilize the network. Here’s why it’s beneficial:
🔹 Stake Duration – The stake remains valid indefinitely until the user chooses to unstake.
🔹 Lock-in Period – Staked ETCPOW is locked for 30 days to prevent abuse.
🔹 Unstaking Flexibility – After 30 days, users can unstake their full ETCPOW without penalties.
Key Benefits of Staking:
✅ Stabilizes ETCPOW Value – Encourages staking, reducing market volatility.
✅ Fair Reward Distribution – Ensures rewards are fairly distributed among participants.
-
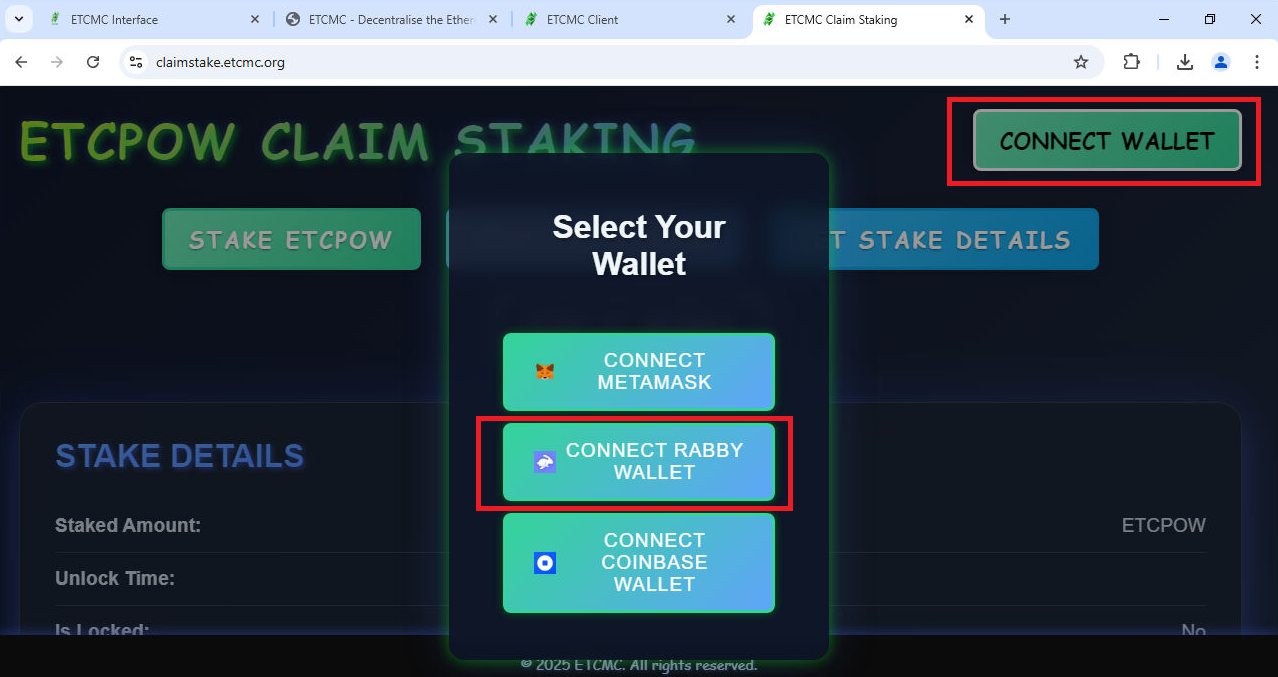
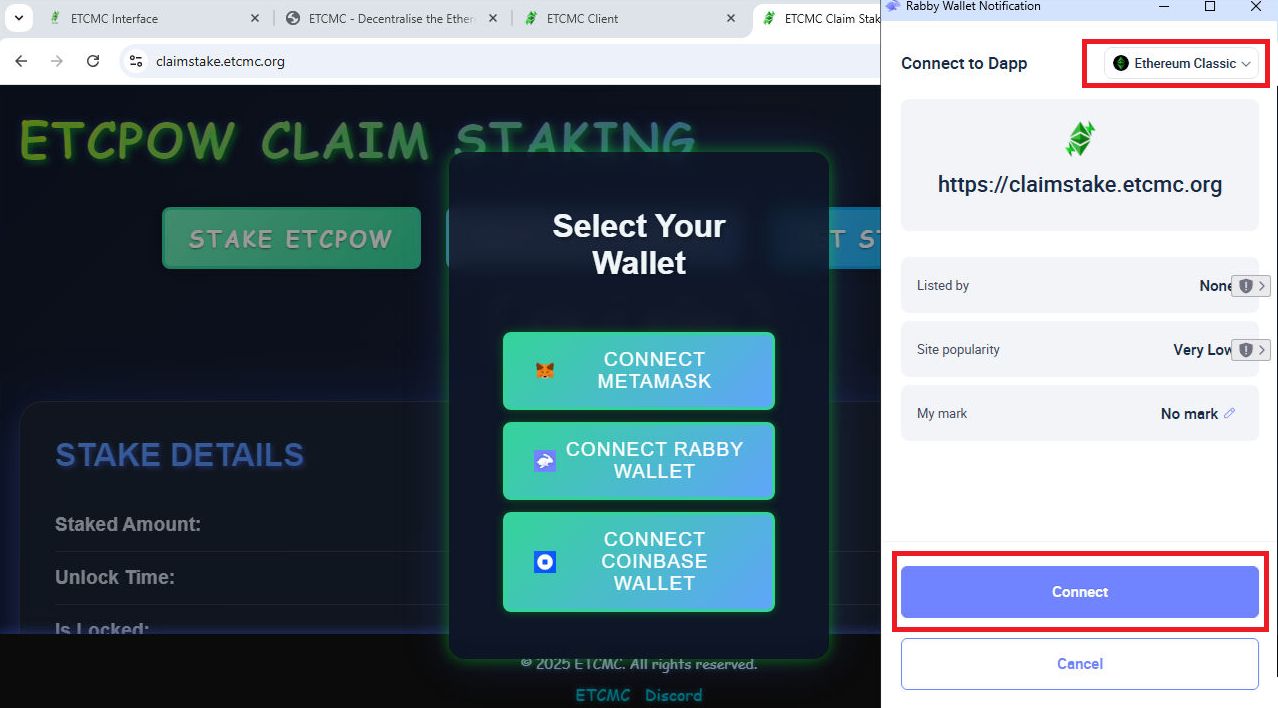
Open the Claimstake website and click on "CONNECT WALLET"
-
Select "CONNECT RABBY WALLET" (or MetaMask if using that)
-
A Rabby Wallet pop-up will appear
-
Ensure "Ethereum Classic" is selected as the network
-
Click "Connect" to approve the connection
-
Before staking, you can check how much ETCPOW is required by clicking "GET STAKE DETAILS".
-
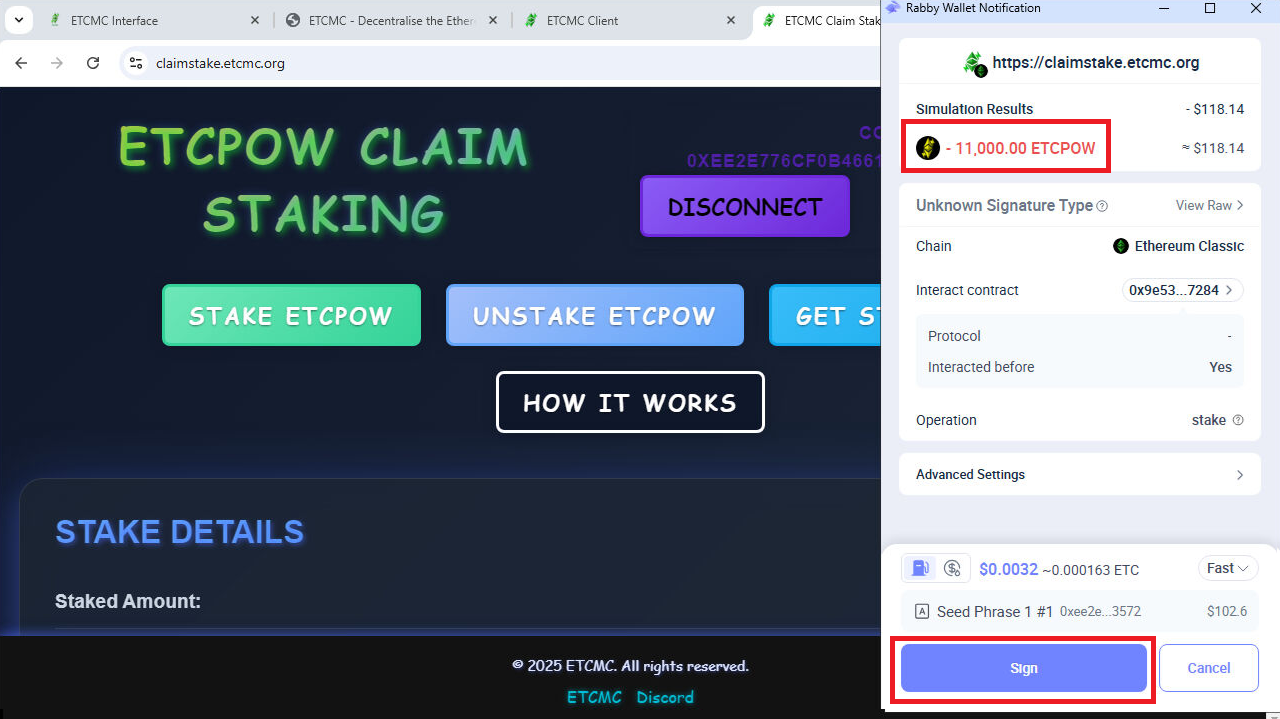
Click "STAKE ETCPOW" to start the staking process
-
A Rabby Wallet pop-up will appear, requesting approval for the transaction.
-
Click "Sign" and "Confirm" to approve the transaction

-
Review the transaction, the amount of ETCPOW being staked is displayed
-
Click "Sign" and "Confirm" to do the transaction
-
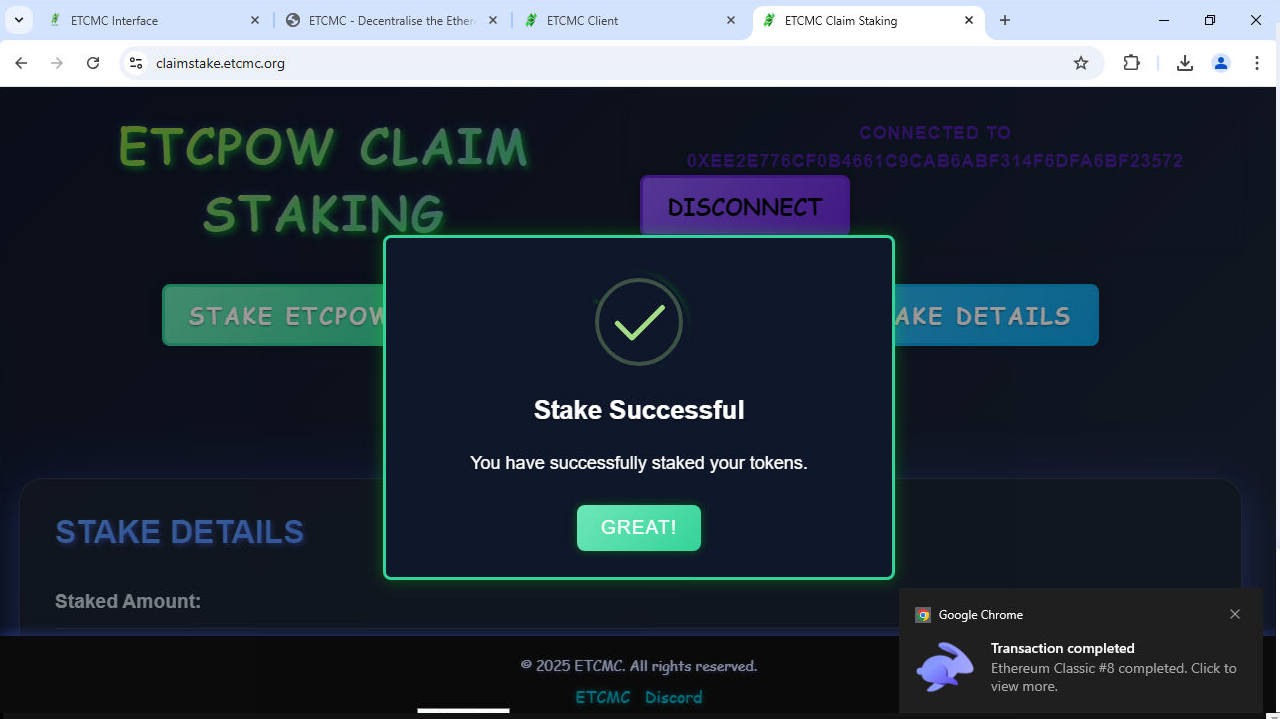
You have successfully staked your ETCPOW tokens. 🎉
-
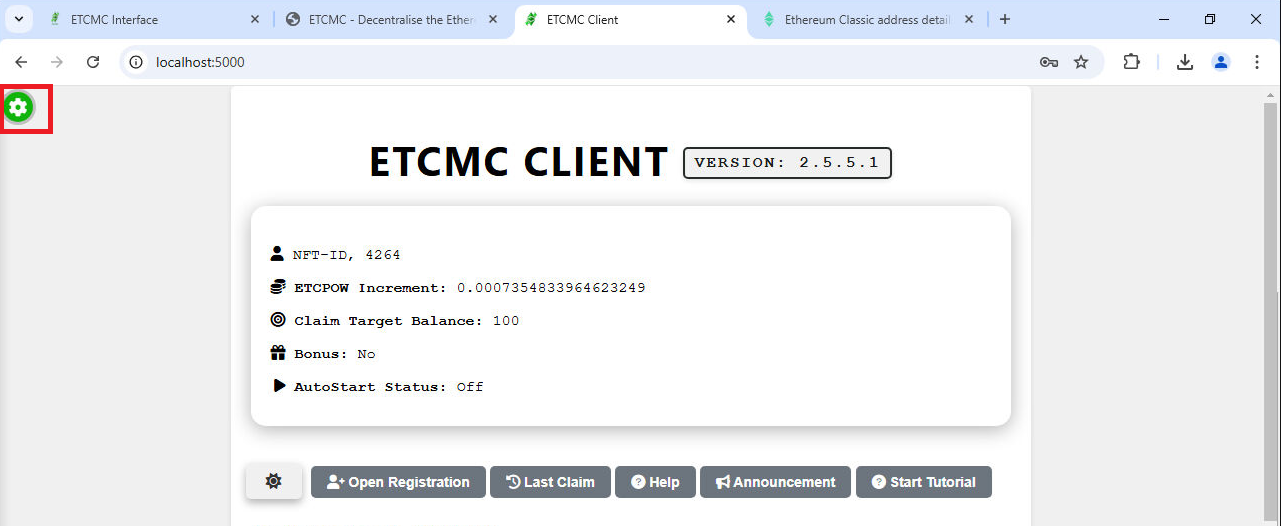
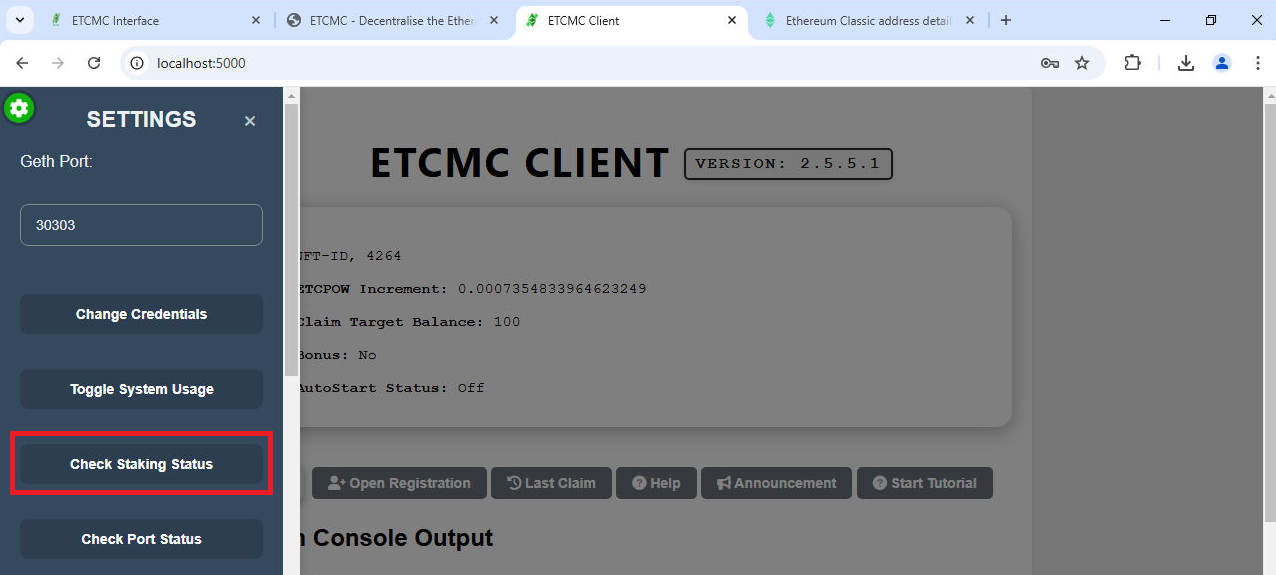
Back to your Node Dashboard - Click on the Gear Wheel (top left corner) to access Node Settings
-
In the Settings Menu, click on "Check Staking Status" to verify if your ETCPOW staking is active
-
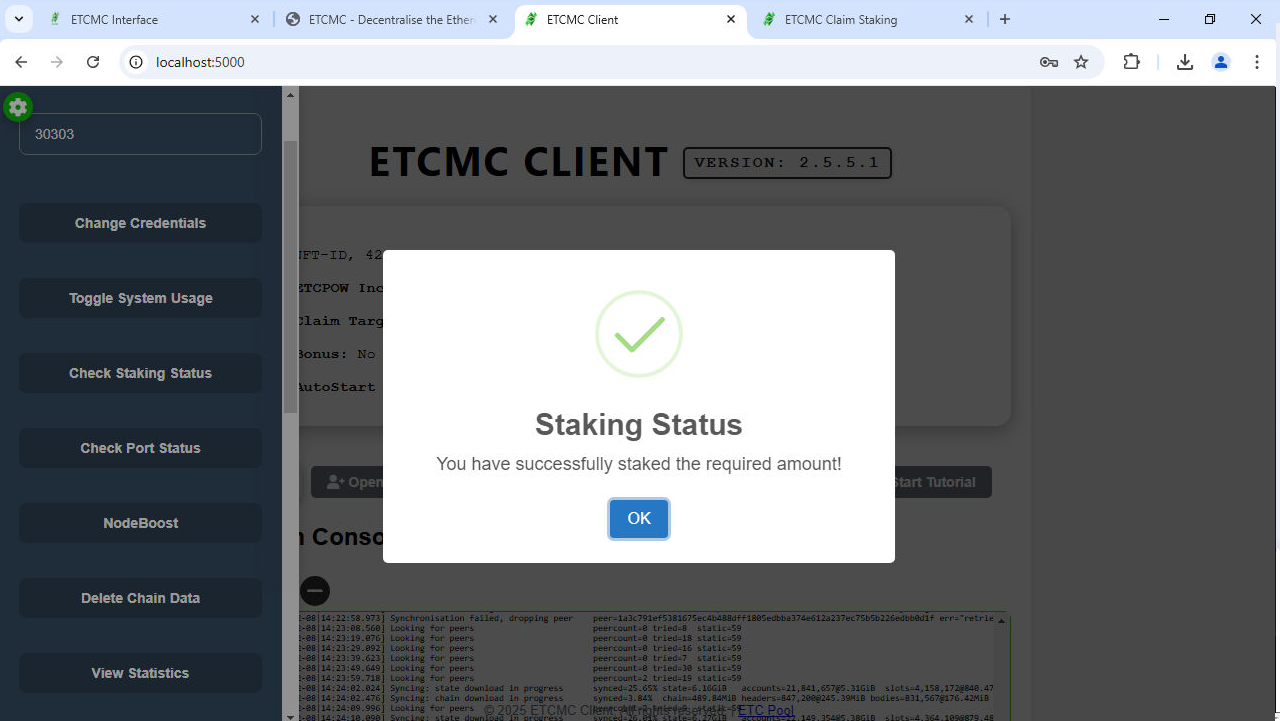
You have successfully staked the required amount of ETCPOW! 🎉

If you have any suggestions for improvements, please let me know - ETCMC - Exodus